Java Bean 是 Java 编程语言中的一种编程规范,用于创建可重用组件。它是一种普通的 Java 类,遵循特定的命名规则和设计模式,目的是封装数据和行为,使得这些组件能够在不同的应用程序中被方便地复用。而 Spring 中的 Bean 指的是将对象的生命周期,交个 Spring IoC 容器来管理的对象
Bean
In Spring, the objects that form the backbone of your application and that are managed by the Spring IoC container are called beans. A bean is an object that is instantiated, assembled, and otherwise managed by a Spring IoC container. Otherwise, a bean is simply one of many objects in your application. Beans, and the dependencies among them, are reflected in the configuration metadata used by a container.
简而言之,Spring Bean 是由 Spring IoC 容器实例化、组装和管理的对象
Spring Bean 的特点和优势:
依赖注入 (Dependency Injection ):Spring Bean 的一个重要特点是依赖注入,即通过容器将对象之间的依赖关系动态注入到 Bean 中。这样,对象之间的耦合性降低,使得应用程序更加灵活和易于维护
面向切面编程 (Aspect-Oriented Programming,AOP ):Spring Bean 支持面向切面编程,允许开发者将应用程序的业务逻辑和横切关注点(例如日志记录、事务管理等)进行解耦。通过 AOP,可以将横切关注点作为切面,与业务逻辑分离开来,提高了代码的模块性和复用性
单例和原型模式 :Spring Bean 可以配置为单例(Singleton )模式或原型(Prototype )模式。在单例模式下,Spring 容器只会创建一个 Bean 实例并共享给所有请求,而在原型模式下,每次请求都会创建一个新的 Bean 实例
生命周期管理 :Spring Bean 的生命周期由 Spring 容器管理,容器负责在 Bean 的创建、初始化、使用和销毁时进行相应的操作。开发者可以通过实现特定的接口或使用注解来管理 Bean 的生命周期
灵活配置 :Spring Bean 可以通过 XML 配置文件、Java 注解或者 Java 配置类进行定义和配置,使得开发者可以根据不同的需求选择适合的配置方式
Bean 的生命周期 这里说的 Spring Bean 的生命周期主要指的是 singleton bean,对于 prototype 的 bean ,Spring 在创建好交给使用者之后,Bean 的实例就交给客户端代码管理,Spring 容器将不再跟踪其生命周期。每次客户端请求 prototype 作用域的 Bean 时,Spring 容器都会创建一个新的实例,并且不会管那些被配置成 prototype 作用域的 Bean 的生命周期。
了解 Spring 生命周期的意义就在于,可以利用 Bean 在其存活期间的指定时刻完成一些相关操作 。这种时刻可能有很多,但一般情况下,会在 Bean 被初始化后和被销毁前执行一些相关操作
对于普通的 Java 对象来说,它们的生命周期就是:
实例化
该对象不再被使用时通过垃圾回收机制进行回收
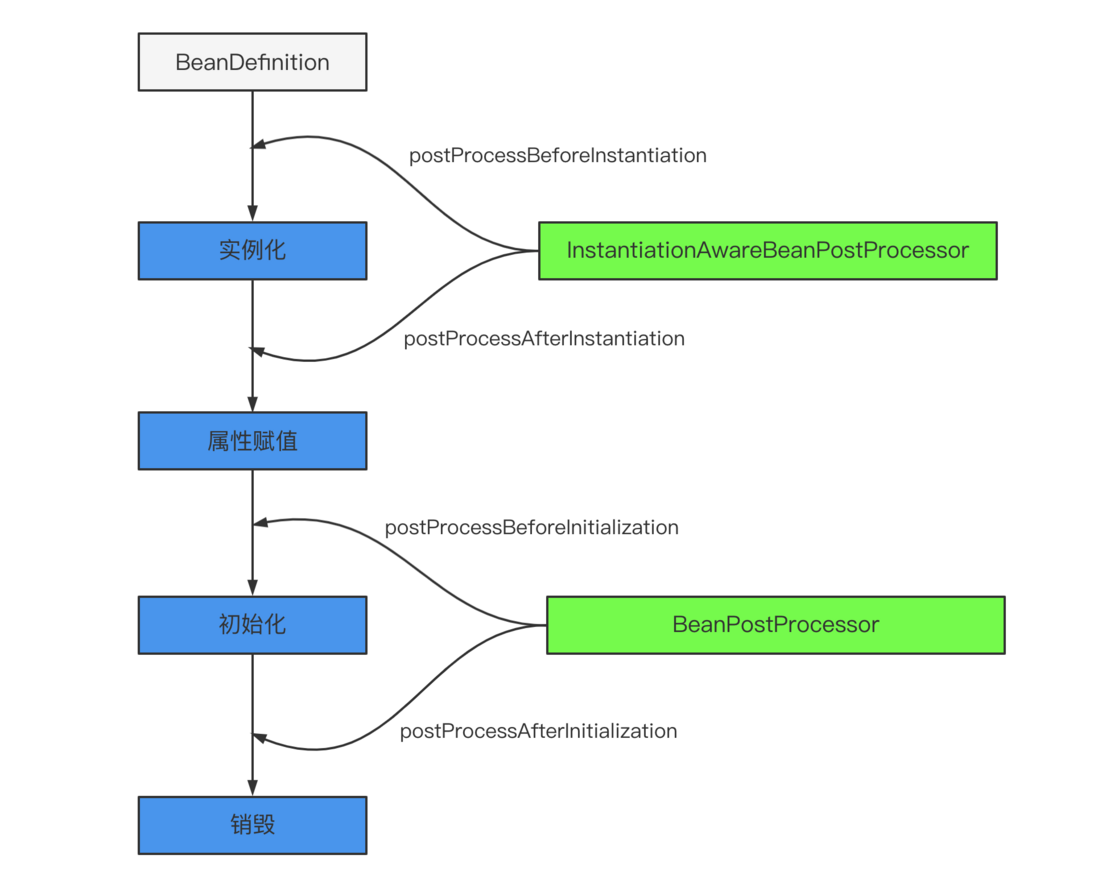
而对于 Spring Bean 的生命周期来说:Bean 在 Spring(IoC )中从创建到销毁的整个过程。Spring 中 Bean 的生命周期主要包含以下 5 部分:
实例化 Instantiation :实例化一个 bean 对象
属性赋值 Populate :为 bean 设置相关属性和依赖
初始化 Initialization
执行各种通知 Aware
执行初始化的前置方法 BeanPostProcessor before
执行初始化方法 Init-method
执行初始化的后置方法 BeanPostProcessor after
销毁 Destruction
在 bean 准备就绪之前,bean 工厂执行了以下启动步骤:
Spring 对 bean 进行实例化;
Spring 将值和 bean 的引用注入到 bean 对应的属性中;
如果 bean 实现了 BeanNameAware 接口,Spring 将 bean 的ID传递给 setBeanName() 方法;
如果 bean实现了 BeanFactoryAware 接口,Spring 将调用 setBeanFactory() 方法,将BeanFactory容器实列传入;
如果 bean 实现了 ApplicationContextAware 接口,Spring 将调用 setApplicationContext() 方法,将bean所在的应用上下文的引用传入进来;
如果 bean 实现了 BeanPostProcessor 接口,Spring 将调用它们的 postProcessBeforeInitialization() 方法;
如果 bean 实现了 InitializingBean 接口,Spring 将调用它们的 afterPropertiesSet() 方法。类似地,如果 bean 使用 init-method 声明了初始化方法,该方法也会被调用;
如果 bean 实现了 BeanPostProcessor 接口,Spring 将调用它们的 postProcessAfterInitialization() 方法;
此时,bean 已经准备就绪,可以被应用程序使用了,它们将一直驻留在应用上下文中,直到该应用上下文被销毁;
如果bean实现了 DisposableBean 接口,Spring将调用它的 destroy() 接口方法。同样,如果 bean 使用 destroy-method 声明了销毁方法,该方法也会被调用。
以上生命周期中,需要注意的是:“实例化 ”和“初始化 ”是两个完全不同的过程,实例化只是给 Bean 分配了内存空间,而初始化则是将程序的执行权,从系统级别转换到用户级别,并开始执行用户添加的业务代码
Bean 生命周期中的扩展点 Bean 自身的方法 比如构造函数、getter / setter 以及 init-method 和 destory-method 所指定的方法等,也就对应着上文说的实例化 -> 属性赋值 -> 初始化 -> 销毁四个阶段
容器级的方法(BeanPostProcessor 一系列接口) 主要是后处理器方法,比如下图的 InstantiationAwareBeanPostProcessor、BeanPostProcessor 接口方法。这些接口的实现类是独立于 Bean 的,并且会注册到 Spring 容器中。在 Spring 容器创建任何 Bean 的时候,这些后处理器都会发生作用
InstantiationAwareBeanPostProcessor InstantiationAwareBeanPostProcessor 继承了 BeanPostProcessor
1
2
3
4
5
6
7
8
9
10
11
12
13
14
15
16
17
public interface InstantiationAwareBeanPostProcessor extends BeanPostProcessor {@Nullable default Object postProcessBeforeInstantiation (Class<?> beanClass, String beanName) throws BeansException {return null ;default boolean postProcessAfterInstantiation (Object bean, String beanName) throws BeansException {return true ;@Nullable default PropertyValues postProcessProperties (PropertyValues pvs, Object bean, String beanName) throws BeansException {return null ;
InstantiationAwareBeanPostProcessor#postProcessBeforeInstantiation 调用点
Object postProcessBeforeInstantiation(Class<?> beanClass, String beanName)InstantiationAwareBeanPostProcessor接口中的postProcessBeforeInstantiation,在实例化之前调用BeanPostProcessor接口中的postProcessAfterInitialization,在实例化之后调用。
1
2
3
4
5
6
7
8
9
10
11
12
13
14
@Override protected Object createBean (String beanName, RootBeanDefinition mbd, @Nullable Object[] args) {Object bean = resolveBeforeInstantiation(beanName, mbdToUse);if (bean != null ) {return bean;Object beanInstance = doCreateBean(beanName, mbdToUse, args);
1
2
3
4
5
6
7
8
9
10
11
12
13
14
15
16
17
18
19
20
@Nullable protected Object resolveBeforeInstantiation (String beanName, RootBeanDefinition mbd) {Object bean = null ;if (!Boolean.FALSE.equals(mbd.beforeInstantiationResolved)) {if (!mbd.isSynthetic() && hasInstantiationAwareBeanPostProcessors()) {if (targetType != null ) {if (bean != null ) {null );return bean;
总之,postProcessBeforeInstantiation 在 doCreateBean 之前调用,也就是在 bean 实例化之前调用的,英文源码注释解释道该方法的返回值会替换原本的 Bean 作为代理,这也是 AOP 等功能实现的关键点
InstantiationAwareBeanPostProcessor#postProcessAfterInstantiation 调用点
boolean postProcessAfterInstantiation(Object bean, String beanName) throws BeansExceptionpopulateBean之前调用postProcessPropertyValues将不会执行,但是初始化和BeanPostProcessor的仍然会执行。
1
2
3
4
5
6
7
8
9
10
11
12
13
14
15
16
17
18
19
20
21
22
23
24
25
26
27
28
29
30
31
32
33
34
35
36
37
38
39
40
41
42
43
44
45
46
47
48
49
50
51
52
53
54
55
protected void populateBean (String beanName, RootBeanDefinition mbd, @Nullable BeanWrapper bw) {if (bw == null ) {if (mbd.hasPropertyValues()) {throw new BeanCreationException ("Cannot apply property values to null instance" );else {return ;if (!mbd.isSynthetic() && hasInstantiationAwareBeanPostProcessors()) {for (InstantiationAwareBeanPostProcessor bp : getBeanPostProcessorCache().instantiationAware) {if (!bp.postProcessAfterInstantiation(bw.getWrappedInstance(), beanName)) {return ;if (hasInstAwareBpps) {if (pvs == null ) {for (InstantiationAwareBeanPostProcessor bp : getBeanPostProcessorCache().instantiationAware) {PropertyValues pvsToUse = bp.postProcessProperties(pvs, bw.getWrappedInstance(), beanName);if (pvsToUse == null ) {if (filteredPds == null ) {if (pvsToUse == null ) {return ;if (needsDepCheck) {if (filteredPds == null ) {if (pvs != null ) {
public PropertyValues postProcessPropertyValues(PropertyValues pvs, PropertyDescriptor[] pds, Object bean, String beanName)
实例化之后调用,在方法 applyPropertyValues【属性填充】之前
pvsToUse 返回值:如果返回 null,那么将不会进行后续的属性填充,比如依赖注入等,如果返回的 pvs 额外的添加了属性,那么后续会填充到该类对应的属性中pvs :PropertyValues 对象,用于封装指定类的对象,简单来说就是 PropertyValue 的集合,里面相当于以key-value形式存放类的属性和值。pds :PropertyDescriptor 对象数组,PropertyDescriptor 相当于存储类的属性,不过可以调用set,get方法设置和获取对应属性的值。
1
2
3
4
5
6
7
8
9
10
11
12
13
14
15
16
17
18
19
20
PropertyDescriptor[] filteredPds = null ;if (hasInstAwareBpps) {if (pvs == null ) {for (InstantiationAwareBeanPostProcessor bp : getBeanPostProcessorCache().instantiationAware) {PropertyValues pvsToUse = bp.postProcessProperties(pvs, bw.getWrappedInstance(), beanName);if (pvsToUse == null ) {if (filteredPds == null ) {if (pvsToUse == null ) {return ;
BeanPostProcessor 源码分析
org.springframework.beans.factory.support.AbstractAutowireCapableBeanFactory#doCreateBean
1
2
3
4
5
6
7
8
9
10
11
12
13
14
15
16
17
18
19
20
21
22
protected Object doCreateBean (String beanName, RootBeanDefinition mbd, @Nullable Object[] args) {BeanWrapper instanceWrapper = null ;if (mbd.isSingleton()) {this .factoryBeanInstanceCache.remove(beanName);if (instanceWrapper == null ) {Object exposedObject = bean;try {
进入初始化接口:
1
2
3
4
5
6
7
8
9
10
11
12
13
14
15
16
17
protected Object initializeBean (String beanName, Object bean, @Nullable RootBeanDefinition mbd) {Object wrappedBean = bean;if (mbd == null || !mbd.isSynthetic()) {if (mbd == null || !mbd.isSynthetic()) {return wrappedBean;
先来看
org.springframework.beans.factory.support.AbstractAutowireCapableBeanFactory#applyBeanPostProcessorsBeforeInitialization
1
2
3
4
5
6
7
8
9
10
11
12
13
14
15
16
@Override public Object applyBeanPostProcessorsBeforeInitialization (Object existingBean, String beanName) throws BeansException {Object result = existingBean;for (BeanPostProcessor processor : getBeanPostProcessors()) {Object current = processor.postProcessBeforeInitialization(result, beanName);if (current == null ) {return result;return result;
首先获取到所有的后置处理器 getBeanPostProcessors()
在 for 循环中依次调用后置处理器的方法 processor.postProcessBeforeInitialization(result, beanName);
进入 postProcessBeforeInitialization 方法
org.springframework.context.support.ApplicationContextAwareProcessor#postProcessBeforeInitialization
1
2
3
4
5
6
7
8
9
10
11
12
13
14
15
16
17
18
19
20
21
22
23
24
25
26
27
28
29
@Override @Nullable public Object postProcessBeforeInitialization (Object bean, String beanName) throws BeansException {if (!(bean instanceof EnvironmentAware || bean instanceof EmbeddedValueResolverAware ||instanceof ResourceLoaderAware || bean instanceof ApplicationEventPublisherAware ||instanceof MessageSourceAware || bean instanceof ApplicationContextAware ||instanceof ApplicationStartupAware)) {return bean;AccessControlContext acc = null ;if (System.getSecurityManager() != null ) {this .applicationContext.getBeanFactory().getAccessControlContext();if (acc != null ) {return null ;else {return bean;
进入 invokeAwareInterfaces(bean) 方法,当前 bean 实现了 ApplicationContextAware 接口
1
2
3
4
5
6
7
8
9
10
11
12
13
14
15
16
17
18
19
20
21
22
23
private void invokeAwareInterfaces (Object bean) {if (bean instanceof EnvironmentAware) {this .applicationContext.getEnvironment());if (bean instanceof EmbeddedValueResolverAware) {this .embeddedValueResolver);if (bean instanceof ResourceLoaderAware) {this .applicationContext);if (bean instanceof ApplicationEventPublisherAware) {this .applicationContext);if (bean instanceof MessageSourceAware) {this .applicationContext);if (bean instanceof ApplicationStartupAware) {this .applicationContext.getApplicationStartup());if (bean instanceof ApplicationContextAware) {this .applicationContext);
ApplicationContextAwareProcessor#postProcessBeforeInitialization 首先判断此 bean 是不是各种的Aware,如果是它列举的那几个 Aware 就获取 Bean 工厂的权限,可以向容器中导入相关的上下文环境,目的是为了 Bean 实例能够获取到相关的上下文,如果不是它列举的几个 Aware,那就调用 invokeAwareInterfaces(bean),向容器中添加相关接口的上下文环境。
Bean 级生命周期方法 这个包括了BeanNameAware、BeanFactoryAware、InitializingBean和DiposableBean这些接口的方法
Aware 类型的接口 Aware 类型的接口的作用就是让我们能够拿到 Spring 容器中的一些资源。基本都能够见名知意,Aware 之前的名字就是可以拿到什么资源,例如 BeanNameAware 可以拿到 BeanName,以此类推。调用时机需要注意:所有的 Aware 方法都是在初始化阶段之前调用的。
Aware 接口众多,这里同样通过分类的方式帮助大家记忆。Aware 接口具体可以分为两组,至于为什么这么分,详见下面的源码分析。如下排列顺序同样也是 Aware 接口的执行顺序,能够见名知意的接口不再解释。
Aware Group1
BeanNameAwareBeanClassLoaderAwareBeanFactoryAware
Aware Group2
EnvironmentAware
EmbeddedValueResolverAwareSpring EL 解析器,用户的自定义注解需要支持 SPEL 表达式的时候可以使用
ApplicationContextAware(ResourceLoaderAware/ApplicationEventPublisherAware/MessageSourceAware)ApplicationContext 对象,因为 ApplicationContext 是一个复合接口,如下:
1
2
3
4
5
6
7
8
9
10
11
12
13
14
15
16
17
18
public interface ApplicationContext extends EnvironmentCapable , ListableBeanFactory, HierarchicalBeanFactory,@Nullable getId () ;getApplicationName () ;getDisplayName () ;long getStartupDate () ;@Nullable getParent () ;getAutowireCapableBeanFactory () throws IllegalStateException;
Aware 调用时机源码分析
org.springframework.beans.factory.support.AbstractAutowireCapableBeanFactory#initializeBean(java.lang.String, java.lang.Object, org.springframework.beans.factory.support.RootBeanDefinition)
1
2
3
4
5
6
7
8
9
10
11
12
13
14
15
16
17
18
19
20
21
22
23
24
25
26
27
28
29
30
31
32
33
34
35
protected Object initializeBean (String beanName, Object bean, @Nullable RootBeanDefinition mbd) {if (System.getSecurityManager() != null ) {return null ;else {Object wrappedBean = bean;if (mbd == null || !mbd.isSynthetic()) {try {catch (Throwable ex) {throw new BeanCreationException (null ? mbd.getResourceDescription() : null ),"Invocation of init method failed" , ex);if (mbd == null || !mbd.isSynthetic()) {return wrappedBean;
并不是 所有的 Aware 接口都使用同样的方式调用。Bean××Aware 都是在代码中直接调用的,而 ApplicationContext 相关的 Aware 都是通过 BeanPostProcessor#postProcessBeforeInitialization() 实现的。感兴趣的可以自己看一下 ApplicationContextAwareProcessor 这个类的源码,就是判断当前创建的 Bean 是否实现了相关的 Aware 方法,如果实现了会调用回调方法将资源传递给 Bean
BeanPostProcessor 的调用时机也能在这里体现,包围住 invokeInitMethods 方法,也就说明了在初始化阶段的前后执行
关于 Aware 接口的执行顺序,其实只需要记住第一组在第二组执行之前就行了
生命周期接口 剩下的两个生命周期接口,实例化和属性赋值都是 Spring 帮助我们做的,能够自己实现的有初始化和销毁两个生命周期阶段
InitializingBean 接口 的定义如下:
1
2
3
4
public interface InitializingBean {void afterPropertiesSet () throws Exception;
InitializingBean 对应生命周期的初始化阶段,在上面源码的 invokeInitMethods(beanName, wrappedBean, mbd)方法中调用。
有一点需要注意,因为 Aware 方法都是执行在初始化方法之前,所以可以在初始化方法中放心大胆的使用 Aware 接口获取的资源,这也是我们自定义扩展 Spring 的常用方式。InitializingBean 接口之外还能通过注解或者 xml 配置的方式指定初始化方法,至于这几种定义方式的调用顺序其实没有必要记。因为这几个方法对应的都是同一个生命周期,只是实现方式不同,我们一般只采用其中一种方式
DisposableBean 类似于 InitializingBean,对应生命周期的销毁阶段,以ConfigurableApplicationContext#close()方法作为入口,实现是通过循环取所有实现了 DisposableBean 接口的 Bean 然后调用其 destroy() 方法,感兴趣的可以自行跟一下源码。
Spring Bean 生命周期流程图
工厂后处理器接口方法 这个包括了AspectJWeavingEnabler , ConfigurationClassPostProcessor, CustomAutowireConfigurer等等非常有用的工厂后处理器接口的方法。工厂后处理器也是容器级的。在应用上下文装配配置文件之后立即调用
对于工厂后处理器方法看refresh() 里的 invokeBeanFactoryPostProcessors(beanFactory) 方法,这个方法处理的是 BeanFactoryPostProcessor 接口的 Bean。调用方法如下:
1
2
3
4
5
6
7
8
9
10
protected void invokeBeanFactoryPostProcessors (ConfigurableListableBeanFactory beanFactory) {if (!NativeDetector.inNativeImage() && beanFactory.getTempClassLoader() == null && beanFactory.containsBean(LOAD_TIME_WEAVER_BEAN_NAME)) {new LoadTimeWeaverAwareProcessor (beanFactory));new ContextTypeMatchClassLoader (beanFactory.getBeanClassLoader()));
跟到最重要的方法 invokeBeanFactoryPostProcessors
BeanFactoryPostProcessor:一切处理 BeanFactory 的父接口BeanDefinitionRegistryPostProcessor:实现了 BeanFactoryPostProcessor 接口的接口
1
2
3
4
5
6
7
8
9
10
11
12
13
14
15
16
17
18
19
20
21
22
23
24
25
26
27
28
29
30
31
32
33
34
35
36
37
38
39
40
41
42
43
44
45
46
47
48
49
50
51
52
53
54
55
56
57
58
59
60
61
62
63
64
65
66
67
68
69
70
71
72
73
74
75
76
77
78
79
80
81
82
83
84
85
86
87
88
89
90
91
92
93
94
95
96
97
98
99
100
101
102
103
104
105
106
107
108
109
110
111
112
113
114
115
116
117
118
119
120
121
122
123
124
125
126
127
128
129
130
public static void invokeBeanFactoryPostProcessors ( ConfigurableListableBeanFactory beanFactory, List<BeanFactoryPostProcessor> beanFactoryPostProcessors) {new HashSet <>();if (beanFactory instanceof BeanDefinitionRegistry) {BeanDefinitionRegistry registry = (BeanDefinitionRegistry) beanFactory;new ArrayList <>();new ArrayList <>();for (BeanFactoryPostProcessor postProcessor : beanFactoryPostProcessors) {if (postProcessor instanceof BeanDefinitionRegistryPostProcessor) {BeanDefinitionRegistryPostProcessor registryProcessor = else {new ArrayList <>();true , false );for (String ppName : postProcessorNames) {if (beanFactory.isTypeMatch(ppName, PriorityOrdered.class)) {true , false );for (String ppName : postProcessorNames) {if (!processedBeans.contains(ppName) && beanFactory.isTypeMatch(ppName, Ordered.class)) {boolean reiterate = true ;while (reiterate) {false ;true , false );for (String ppName : postProcessorNames) {if (!processedBeans.contains(ppName)) {true ;else {true , false );new ArrayList <>();new ArrayList <>();new ArrayList <>();for (String ppName : postProcessorNames) {if (processedBeans.contains(ppName)) {else if (beanFactory.isTypeMatch(ppName, PriorityOrdered.class)) {else if (beanFactory.isTypeMatch(ppName, Ordered.class)) {else {new ArrayList <>(orderedPostProcessorNames.size());for (String postProcessorName : orderedPostProcessorNames) {new ArrayList <>(nonOrderedPostProcessorNames.size());for (String postProcessorName : nonOrderedPostProcessorNames) {
流程说明:
调用 BeanDefinitionRegistryPostProcessor#postProcessBeanDefinitionRegistry(registry) 方法。参数 beanFactoryPostProcessors 传入的优先处理掉。然后获取容器注册的,对于这些 Bean 按照 PriorityOrdered 接口、Ordered、没有排序接口的实例分别进行处理
调用 BeanFactoryPostProcessor#postProcessBeanFactory(beanFactory) 方法。备注:BeanDefinitionRegistryPostProcessor 属于 BeanFactoryPostProcessor 子接口。先处理属于 BeanDefinitionRegistryPostProcessor 接口实例的 postProcessBeanFactory(beanFactory) 方法,然后获取容器注册的。对于这些 Bean 按照 PriorityOrdered 接口、Ordered、没有排序接口的实例分别进行处理
常用接口说明 BeanNameAware
该接口只有一个方法 setBeanName(String name),用来获取 bean 的 id 或者 name
BeanFactoryAware
该接口只有一个方法 setBeanFactory(BeanFactory beanFactory),用来获取当前环境中 的 BeanFactory
ApplicationContextAware
该接口只有一个方法 setApplicationContext(ApplicationContext applicationContext),用来获取当前环境中的 ApplicationContext
InitializingBean
该接口只有一个方法 afterPropertiesSet(),在属性注入完成 后调用
DisposableBean
该接口只有一个方法 destroy(),在容器销毁的时候调用,在用户指定 的 destroy-method 之前调用
BeanPostProcessor
该接口有两个方法:
postProcessBeforeInitialization(Object bean, String beanName):在初始化之前 调用此方法postProcessAfterInitialization(Object bean, String beanName):在初始化之后 调用此方法
通过方法签名我们可以知道,我们可以通过 beanName 来筛选出我们需要进行个性化定制的 bean
InstantiationAwareBeanPostProcessor
该类是 BeanPostProcessor 的子接口,常用的有如下三个方法:
postProcessBeforeInstantiation(Class beanClass, String beanName):在 bean 实例化之前 调用postProcessProperties(PropertyValues pvs, Object bean, String beanName):在 bean 实例化之后 、设置属性前 调用postProcessAfterInstantiation(Class beanClass, String beanName):在 bean 实例化之后 调用