AQS (Abstract Queued Synchronizer),它是 Java 中 java.util.concurrent 包下的一种基础框架,用于实现各种同步机制,特别是用于多线程编程中的同步操作
AQS 提供了一种基于 FIFO(先进先出)队列的抽象同步器,可以方便地实现各种同步工具,比如锁、信号量、倒计时器等。在 Java 中,ReentrantLock、CountDownLatch、Semaphore等都是使用 AQS 实现的
AQS 的核心思想是使用一个等待队列来管理线程的竞争和等待状态。当线程试图获取锁或资源时,如果资源已经被占用,线程将被放入等待队列中,进入等待状态。当资源释放时,AQS会自动唤醒等待队列中的第一个线程,使其重新尝试获取资源
前置知识
线程的创建方式
- 继承 Thread 类
这是最常见的创建线程的方式。你可以创建一个继承自Thread类的子类,并重写其run()方法来定义线程要执行的任务。然后通过调用子类的start()方法来启动线程
1
2
3
4
5
6
7
8
9
| public class MyThread extends Thread {
public void run() {
}
}
MyThread myThread = new MyThread();
myThread.start();
|
- 实现 Runnable 接口
这是另一种常见的创建线程的方式,它更加灵活,因为Java是单继承的,如果已经继承了其他类,就无法再继承Thread类了。通过实现Runnable接口,你可以在同一个类中实现多个任务,同时也可以共享数据
1
2
3
4
5
6
7
8
9
| public class MyRunnable implements Runnable {
public void run() {
}
}
Thread thread = new Thread(new MyRunnable());
thread.start();
|
- 实现 Callable 接口
Callable接口与Runnable接口类似,但是它可以返回计算结果,并且可以抛出异常。通过FutureTask类可以包装Callable,使其成为一个Runnable。与Runnable不同,Callable在执行时可以返回一个值
1
2
3
4
5
6
7
8
9
10
| public class MyCallable implements Callable<Integer> {
public Integer call() {
return result;
}
}
ExecutorService executorService = Executors.newSingleThreadExecutor();
Future<Integer> future = executorService.submit(new MyCallable());
|
- 使用 Executor 框架:
Java 提供了 Executor 框架,它是一种更高级别的线程管理方式,通过线程池来管理线程的创建和回收,从而提高性能并避免频繁地创建和销毁线程
1
2
3
4
5
| ExecutorService executorService = Executors.newFixedThreadPool(5);
executorService.execute(new MyRunnable());
Future<Integer> future = executorService.submit(new MyCallable());
|
LockSupport 的使用
LockSupport 是 Java 中的一个工具类,用于线程的阻塞和唤醒。它提供了与 Java 对象监视器(synchronized 关键字)相似的功能,但是更加灵活和强大。LockSupport 可以在任意位置对线程进行阻塞和唤醒,而不需要依赖于特定的对象锁
LockSupport 的主要方法包括:
park(): 当前线程阻塞,直到被其他线程调用unpark()方法唤醒,或者被中断Thread.interrupt()
park(Object blocker): 可以传入一个blocker对象,用于标识阻塞的原因,便于调试和监控
unpark(Thread thread): 唤醒指定的线程,如果该线程之前没有被阻塞,那么下一次调用 park() 方法时,它将不会被阻塞
LockSupport 的使用示例:
1
2
3
4
5
6
7
8
9
10
11
12
13
14
15
16
17
18
19
20
21
22
23
24
| import java.util.concurrent.locks.LockSupport;
public class LockSupportExample {
public static void main(String[] args) {
Thread thread = new Thread(() -> {
System.out.println("Thread starts.");
LockSupport.park();
System.out.println("Thread is awakened.");
});
thread.start();
try {
Thread.sleep(2000);
} catch (InterruptedException e) {
e.printStackTrace();
}
LockSupport.unpark(thread);
}
}
|
在上面的例子中,我们创建了一个新的线程,并在其中使用 LockSupport.park() 阻塞该线程。然后在主线程中经过一段时间后,使用 LockSupport.unpark(thread) 唤醒被阻塞的线程。
需要注意的是,LockSupport 不是基于锁的机制,它没有像 synchronized 那样的锁定和释放过程,而是直接对线程进行阻塞和唤醒。因此,在使用 LockSupport 时要特别小心,避免造成死锁等问题。通常,LockSupport 用于高级并发工具的实现,比如 ReentrantLock 和 ThreadPoolExecutor 等
ReentrantLock 的使用
ReentrantLock 是Java中 java.util.concurrent.locks 包下的一个可重入锁实现,它提供了与 synchronized 关键字类似的功能,但更加灵活和强大
以下是 ReentrantLock 的一些主要方法和用法:
创建ReentrantLock对象:
1
| ReentrantLock lock = new ReentrantLock();
|
获取锁:
ReentrantLock 使用 lock() 方法获取锁,如果锁已经被其他线程占用,则当前线程会被阻塞,直到获取到锁
1
2
3
| lock.lock();
lock.unlock();
|
释放锁:
使用 unlock() 方法释放锁。注意,为确保正确释放锁,应在 finally 块中使用 unlock()方法
1
2
3
4
5
6
| lock.lock();
try {
} finally {
lock.unlock();
}
|
可中断获取锁:
ReentrantLock 提供了 lockInterruptibly()方法,该方法允许线程在获取锁的过程中被中断
1
2
3
| lock.lockInterruptibly();
lock.unlock();
|
尝试获取锁:
tryLock() 方法尝试获取锁,如果锁可用,则获取锁并返回 true,如果锁被其他线程占用,则立即返回 false,而不会阻塞当前线程
1
2
3
4
5
6
7
8
9
| if (lock.tryLock()) {
try {
} finally {
lock.unlock();
}
} else {
}
|
获取等待的线程数:
getQueueLength() 方法可以获取当前等待获取锁的线程数量。
1
| int waitingThreads = lock.getQueueLength();
|
ReentrantLock 提供了更多的方法和特性,如公平锁和条件等待,使得它更加灵活和适用于复杂的多线程场景。在使用 ReentrantLock时,需要注意遵循获取锁和释放锁的正确顺序,以避免死锁和竞态条件。同时,要确保在获取锁后一定要释放锁,以防止资源泄漏
一个简单的ReentrantLock的例子:
1
2
3
4
5
6
7
8
9
10
11
12
13
14
15
16
17
18
19
20
21
22
23
24
25
26
27
28
29
30
31
32
33
34
35
36
37
38
39
40
| import java.util.concurrent.locks.ReentrantLock;
public class ReentrantLockExample {
private static final int MAX_COUNT = 5;
private static final ReentrantLock lock = new ReentrantLock();
private static int count = 0;
public static void main(String[] args) {
Runnable task = () -> {
for (int i = 0; i < MAX_COUNT; i++) {
performTask();
}
};
Thread thread1 = new Thread(task);
Thread thread2 = new Thread(task);
thread1.start();
thread2.start();
try {
thread1.join();
thread2.join();
} catch (InterruptedException e) {
e.printStackTrace();
}
System.out.println("Final count: " + count);
}
private static void performTask() {
lock.lock();
try {
count++;
System.out.println("Current count: " + count);
} finally {
lock.unlock();
}
}
}
|
在这个例子中,我们有一个全局变量 count,两个线程通过调用 performTask方法来递增这个计数器。performTask 方法首先通过 lock.lock()获取锁,然后递增 count并输出当前的计数值,最后通过lock.unlock()释放锁
由于ReentrantLock是可重入的,这意味着同一个线程可以多次获取该锁而不会被阻塞。在上面的例子中,两个线程都会交替执行 performTask 方法(并不是严格的交替),每次递增计数器,而不会出现竞争条件。最后输出的count值应该是MAX_COUNT * 2,因为两个线程各自递增了5次
模版方法设计模式
模板方法(Template Method)是一种行为型设计模式,它定义了一个算法的骨架,将一些步骤的具体实现延迟到子类中。这样,子类可以在不改变算法结构的情况下重新定义某些步骤的实现。模板方法模式遵循”开闭原则”,允许在不修改算法结构的情况下修改算法的具体实现
核心思想:
- 定义一个抽象类,该抽象类包含一个模板方法,这个模板方法是一个算法的骨架,它由一系列的步骤组成,其中某些步骤的实现可以在子类中进行重定义
- 模板方法中的某些步骤可以是抽象方法,由子类负责具体实现
- 模板方法中的某些步骤可以是具体方法,已经有默认实现,子类可以选择是否覆盖这些方法
- 子类继承抽象类,并实现其中的抽象方法,从而提供特定的实现细节
通过模板方法模式,将通用算法的结构和步骤定义在抽象类中,而具体实现交给子类完成,这样可以避免代码重复,并且保持算法的一致性。下面通过一个简单的例子来说明模板方法模式:
1
2
3
4
5
6
7
8
9
10
11
12
13
14
15
16
17
18
19
20
21
22
23
24
25
26
27
28
29
30
31
32
33
34
35
36
37
38
39
40
41
42
43
44
45
46
47
48
49
50
51
52
53
54
55
56
57
58
59
60
| abstract class CaffeineBeverage {
final void prepareRecipe() {
boilWater();
brew();
pourInCup();
addCondiments();
}
abstract void brew();
abstract void addCondiments();
void boilWater() {
System.out.println("Boiling water");
}
void pourInCup() {
System.out.println("Pouring into cup");
}
}
class Tea extends CaffeineBeverage {
@Override
void brew() {
System.out.println("Steeping the tea");
}
@Override
void addCondiments() {
System.out.println("Adding lemon");
}
}
class Coffee extends CaffeineBeverage {
@Override
void brew() {
System.out.println("Dripping coffee through filter");
}
@Override
void addCondiments() {
System.out.println("Adding sugar and milk");
}
}
public class TemplateMethodExample {
public static void main(String[] args) {
CaffeineBeverage tea = new Tea();
CaffeineBeverage coffee = new Coffee();
System.out.println("Making tea...");
tea.prepareRecipe();
System.out.println("\nMaking coffee...");
coffee.prepareRecipe();
}
}
|
在这个例子中,CaffeineBeverage 是一个抽象类,它定义了 prepareRecipe 作为模板方法,其中包含了煮水、冲泡、倒入杯子和加入调料等步骤。brew 和 addCondiments 是抽象方法,由具体的子类来实现。boilWater 和 pourInCup 是具体方法,它们已经有默认实现,但也可以在子类中进行重定义
Tea 和 Coffee 是具体的子类,它们继承了 CaffeineBeverage,并实现了其中的抽象方法。通过运行 main 方法,我们可以看到茶和咖啡的制作过程,它们都遵循了 CaffeineBeverage 定义的算法结构,但具体步骤有所不同
AQS 结构
AQS 内部属性包括:
1
2
3
4
5
6
7
8
9
10
11
12
13
14
|
private transient volatile Node head;
private transient volatile Node tail;
private volatile int state;
private transient Thread exclusiveOwnerThread;
|
AbstractQueuedSynchronizer 的等待队列示意如下所示,之后分析过程中所说的 queue,也就是阻塞队列不包含 head
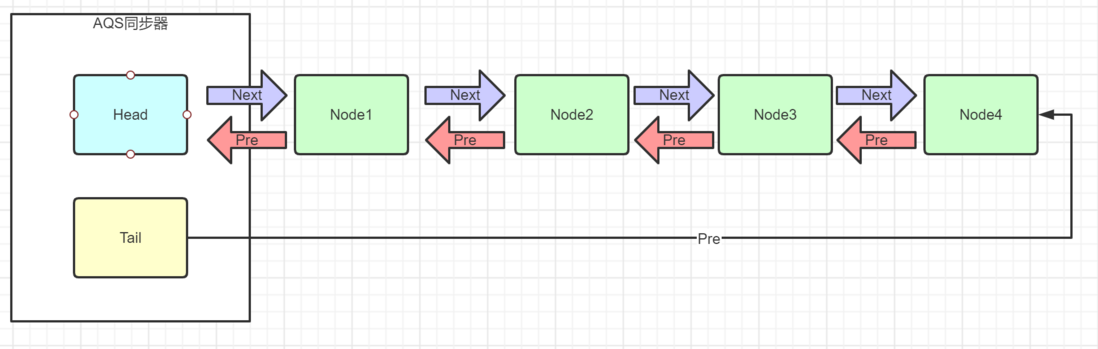
等待队列中每个线程被包装成一个 Node 实例,数据结构是链表:
1
2
3
4
5
6
7
8
9
10
11
12
13
14
15
16
17
18
19
20
21
22
23
24
25
26
27
| static final class Node {
static final Node SHARED = new Node();
static final Node EXCLUSIVE = null;
static final int CANCELLED = 1;
static final int SIGNAL = -1;
static final int CONDITION = -2;
static final int PROPAGATE = -3;
volatile int waitStatus;
volatile Node prev;
volatile Node next;
volatile Thread thread;
}
|
AQS 内部提供了几个重要的方法,用于子类实现具体的同步逻辑,包括:
getState(): 获取同步状态。
setState(int newState): 设置同步状态。
compareAndSetState(int expect, int update): 原子性地更新同步状态。
acquire(int arg): 获取同步状态,如果资源被占用,则将当前线程入队等待。
release(int arg): 释放同步状态,同时唤醒等待队列中的一个线程。
tryAcquire(int arg): 尝试获取同步状态,如果成功返回true,否则返回false。
tryRelease(int arg): 尝试释放同步状态,如果成功返回true,否则返回false。
Java 中的并发工具类如 ReentrantLock、Semaphore、CountDownLatch 等都是通过继承 AQS 并重写其中的方法来实现不同的同步策略
AQS 使用
上面说到了 ReentrantLock 等都是通过继承 AQS 并重写其中抽象方法来实现的。下面,我们开始说 ReentrantLock 的公平锁。再次强调,我说的阻塞队列不包含 head 节点
ReentrantLock 的使用方式
1
2
3
4
5
6
7
8
9
10
11
12
13
14
15
16
17
18
19
20
| public class AService {
private static ReentrantLock reentrantLock = new ReentrantLock(true);
public void testA() {
reentrantLock.lock();
try {
} finally {
reentrantLock.unlock();
}
}
}
|
ReentrantLock 在内部用了内部类 Sync 来管理锁,所以真正的获取锁和释放锁是由 Sync 的实现类来控制的。
1
2
| abstract static class Sync extends AbstractQueuedSynchronizer {
}
|
Sync 有两个实现,分别为 NonfairSync(非公平锁)和 FairSync(公平锁),我们看 FairSync 部分。
1
2
3
| public ReentrantLock(boolean fair) {
sync = fair ? new FairSync() : new NonfairSync();
}
|
线程抢锁
lock() 方法
一般使用lock方法进行加锁,它内部其实是调用的同步器的acquire方法。
acquire 加锁
1
2
3
4
5
6
7
8
| public final void acquire(int arg) {
if (!tryAcquire(arg) &&
acquireQueued(addWaiter(Node.EXCLUSIVE), arg)) {
selfInterrupt();
}
}
|
tryAcquire 尝试获取锁
1
2
3
4
5
6
7
8
9
10
11
12
13
14
15
16
17
18
19
20
21
22
23
24
25
26
27
28
29
30
31
32
|
protected final boolean tryAcquire(int acquires) {
final Thread current = Thread.currentThread();
int c = getState();
if (c == 0) {
if (!hasQueuedPredecessors() &&
compareAndSetState(0, acquires)) {
setExclusiveOwnerThread(current);
return true;
}
}
else if (current == getExclusiveOwnerThread()) {
int nextc = c + acquires;
if (nextc < 0)
throw new Error("Maximum lock count exceeded");
setState(nextc);
return true;
}
return false;
}
|
addWaiter 入队
1
2
3
4
5
6
7
8
9
10
11
12
13
14
15
16
17
18
19
20
21
22
23
24
25
26
27
28
29
30
31
32
33
34
35
36
37
38
39
40
41
42
43
44
45
46
47
48
|
private Node addWaiter(Node mode) {
Node node = new Node(Thread.currentThread(), mode);
Node pred = tail;
if (pred != null) {
node.prev = pred;
if (compareAndSetTail(pred, node)) {
pred.next = node;
return node;
}
}
enq(node);
return node;
}
private Node enq(final Node node) {
for (;;) {
Node t = tail;
if (t == null) {
if (compareAndSetHead(new Node()))
tail = head;
} else {
node.prev = t;
if (compareAndSetTail(t, node)) {
t.next = node;
return t;
}
}
}
}
|
acquireQueued 获取队列
1
2
3
4
5
6
7
8
9
10
11
12
13
14
15
16
17
18
19
20
21
22
23
24
25
26
27
28
29
30
31
32
33
34
35
36
37
38
39
40
41
42
|
final boolean acquireQueued(final Node node, int arg) {
boolean failed = true;
try {
boolean interrupted = false;
for (;;) {
final Node p = node.predecessor();
if (p == head && tryAcquire(arg)) {
setHead(node);
p.next = null;
failed = false;
return interrupted;
}
if (shouldParkAfterFailedAcquire(p, node) && parkAndCheckInterrupt())
interrupted = true;
}
} finally {
if (failed)
cancelAcquire(node);
}
}
|
shouldParkAfterFailedAcquire
1
2
3
4
5
6
7
8
9
10
11
12
13
14
15
16
17
18
19
20
21
22
23
24
25
26
27
28
29
|
private static boolean shouldParkAfterFailedAcquire(Node pred, Node node) {
int ws = pred.waitStatus;
if (ws == Node.SIGNAL)
return true;
if (ws > 0) {
do {
node.prev = pred = pred.prev;
} while (pred.waitStatus > 0);
pred.next = node;
} else {
compareAndSetWaitStatus(pred, ws, Node.SIGNAL);
}
return false;
}
|
这个方法结束根据返回值简单分析下:
- 如果返回true:说明前驱节点的waitStatus = -1,是正常情况,那么当前线程需要被挂起,等待以后被唤醒我们也说过,以后是被前驱节点唤醒,就等着前驱节点拿到锁,然后释放锁的时候叫你好了。
- 如果返回false:说明当前不需要被挂起。
parkAndCheckInterrupt
shouldParkAfterFailedAcquire返回true,则进入parkAndCheckInterrupt这个方法。这个方法的作用就是将当前线程挂起。
1
2
3
4
5
6
|
private final boolean parkAndCheckInterrupt() {
LockSupport.park(this);
return Thread.interrupted();
}
|
回到上面的阻塞代码块
1
2
| if (shouldParkAfterFailedAcquire(p, node) && parkAndCheckInterrupt())
interrupted = true;
|
到这里,当前线程就被阻塞住了,它会一直在这里阻塞,直到它的前驱节点将它唤醒。
unlock() 方法
release 释放锁
1
2
3
4
5
6
7
8
9
| public final boolean release(int arg) {
if (tryRelease(arg)) {
Node h = head;
if (h != null && h.waitStatus != 0)
unparkSuccessor(h);
return true;
}
return false;
}
|
tryRelease 尝试释放锁
1
2
3
4
5
6
7
8
9
10
11
12
13
14
15
16
17
18
|
protected final boolean tryRelease(int releases) {
int c = getState() - releases;
if (Thread.currentThread() != getExclusiveOwnerThread())
throw new IllegalMonitorStateException();
boolean free = false;
if (c == 0) {
free = true;
setExclusiveOwnerThread(null);
}
setState(c);
return free;
}
|
unparkSuccessor 唤醒后继者
1
2
3
4
5
6
7
8
9
10
11
12
13
14
15
16
17
18
19
20
|
private void unparkSuccessor(Node node) {
int ws = node.waitStatus;
if (ws < 0)
compareAndSetWaitStatus(node, ws, 0);
Node s = node.next;
if (s == null || s.waitStatus > 0) {
s = null;
for (Node t = tail; t != null && t != node; t = t.prev)
if (t.waitStatus <= 0)
s = t;
}
if (s != null)
LockSupport.unpark(s.thread);
}
|
这里唤醒以后,代码又会走到这里
1
2
3
4
| private final boolean parkAndCheckInterrupt() {
LockSupport.park(this);
return Thread.interrupted();
}
|
公平锁和非公平锁
ReentrantLock 默认采用非公平锁,除非你在构造方法中传入参数 true
1
2
3
4
5
6
7
| public ReentrantLock() {
sync = new NonfairSync();
}
public ReentrantLock(boolean fair) {
    sync = fair ? new FairSync() : new NonfairSync();
}
|
公平锁的 lock 方法:
1
2
3
4
5
6
7
8
9
10
11
12
13
14
15
16
17
18
19
20
21
22
23
24
25
26
27
28
29
30
31
| static final class FairSync extends Sync {
final void lock() {
acquire(1);
}
public final void acquire(int arg) {
if (!tryAcquire(arg) &&
acquireQueued(addWaiter(Node.EXCLUSIVE), arg))
selfInterrupt();
}
protected final boolean tryAcquire(int acquires) {
final Thread current = Thread.currentThread();
int c = getState();
if (c == 0) {
if (!hasQueuedPredecessors() &&
compareAndSetState(0, acquires)) {
setExclusiveOwnerThread(current);
return true;
}
}
else if (current == getExclusiveOwnerThread()) {
int nextc = c + acquires;
if (nextc < 0)
throw new Error("Maximum lock count exceeded");
setState(nextc);
return true;
}
return false;
}
}
|
非公平锁的 lock 方法:
1
2
3
4
5
6
7
8
9
10
11
12
13
14
15
16
17
18
19
20
21
22
23
24
25
26
27
28
29
30
31
32
33
34
35
36
37
38
| static final class NonfairSync extends Sync {
final void lock() {
if (compareAndSetState(0, 1))
setExclusiveOwnerThread(Thread.currentThread());
else
acquire(1);
}
public final void acquire(int arg) {
if (!tryAcquire(arg) &&
acquireQueued(addWaiter(Node.EXCLUSIVE), arg))
selfInterrupt();
}
protected final boolean tryAcquire(int acquires) {
return nonfairTryAcquire(acquires);
}
}
final boolean nonfairTryAcquire(int acquires) {
final Thread current = Thread.currentThread();
int c = getState();
if (c == 0) {
if (compareAndSetState(0, acquires)) {
setExclusiveOwnerThread(current);
return true;
}
}
else if (current == getExclusiveOwnerThread()) {
int nextc = c + acquires;
if (nextc < 0)
throw new Error("Maximum lock count exceeded");
setState(nextc);
return true;
}
return false;
}
|
总结:公平锁和非公平锁只有两处不同:
- 非公平锁在调用 lock 后,首先就会调用 CAS 进行一次抢锁,如果这个时候恰巧锁没有被占用,那么直接就获取到锁返回了
- 非公平锁在 CAS 失败后,和公平锁一样都会进入到
tryAcquire 方法,在 tryAcquire 方法中,如果发现锁这个时候被释放了(state == 0),非公平锁会直接 CAS 抢锁,但是公平锁会判断等待队列是否有线程处于等待状态,如果有则不去抢锁,乖乖排到后面
公平锁和非公平锁就这两点区别,如果这两次 CAS 都不成功,那么后面非公平锁和公平锁是一样的,都要进入到阻塞队列等待唤醒
相对来说,非公平锁会有更好的性能,因为它的吞吐量比较大。当然,非公平锁让获取锁的时间变得更加不确定,可能会导致在阻塞队列中的线程长期处于饥饿状态