Java 集合(Java Collections )是 Java 编程语言中用于存储、处理和操作一组对象的框架。它提供了一组接口和类,用于在不同的数据结构上执行各种操作。Java集合框架提供了多种集合类型,包括列表(List )、集(Set )、映射(Map )等
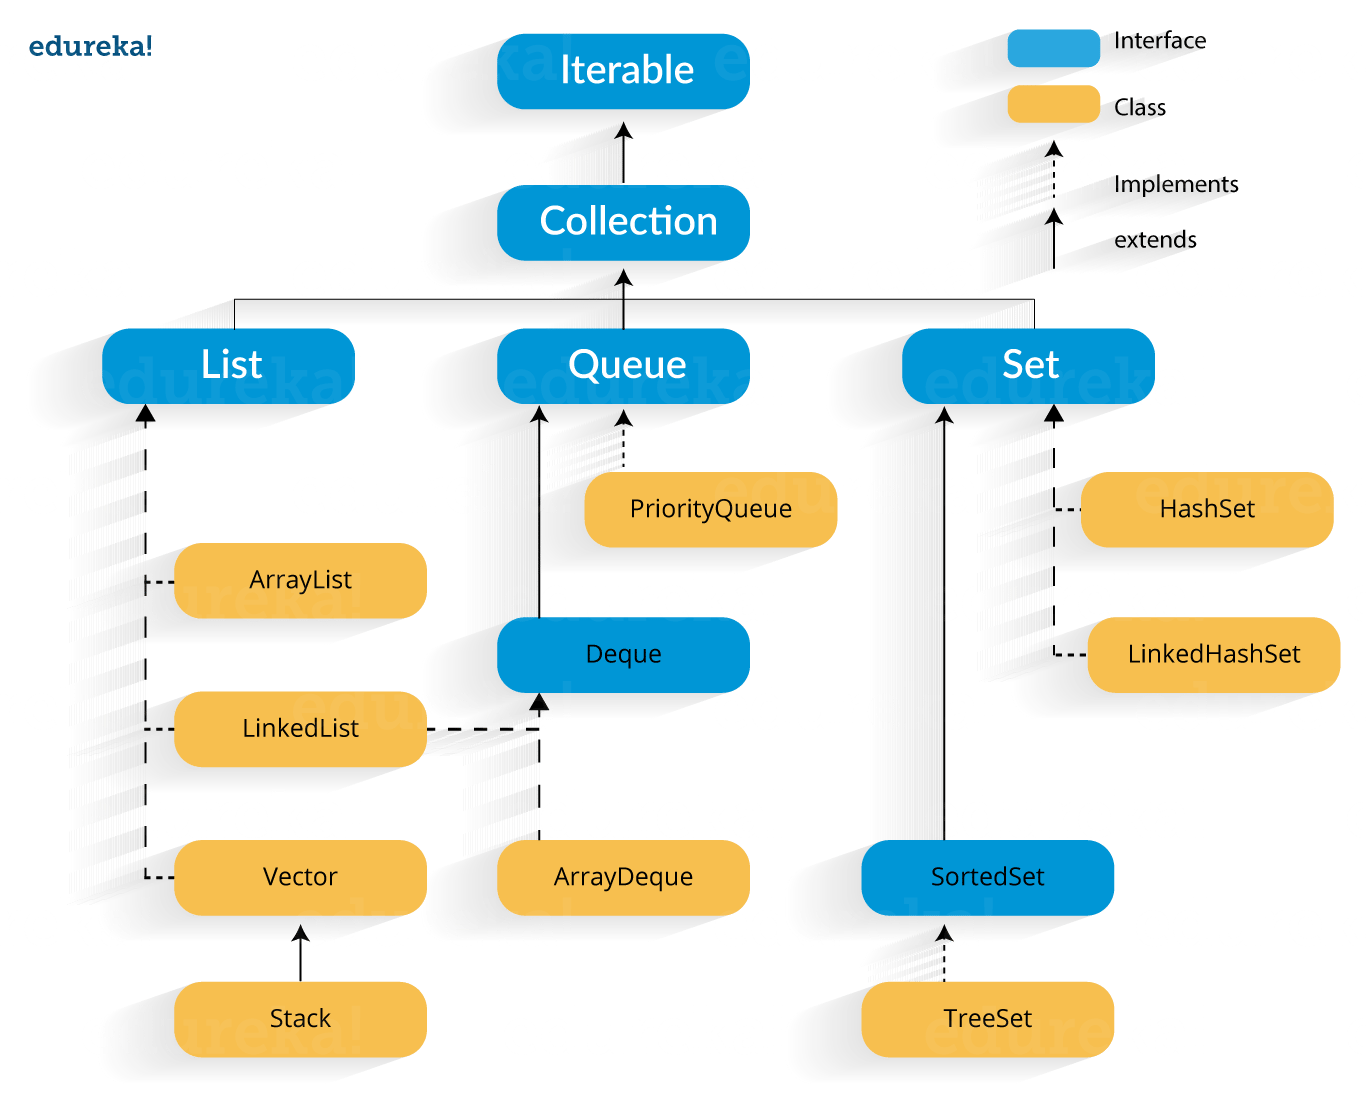
Collection Java标准库自带的 java.util 包提供了集合类:Collection,它是除 Map 外所有其他集合类的根接口。Collection 是一个接口,是高度抽象出来的集合,它包含了集合的基本操作和属性。Collection 接口是 Set,Queue,List的父接口
List 是一个有序的队列 ,每一个元素都有它的索引。第一个元素的索引值是0。List的实现类有LinkedList,ArrayList,Vector,StackSet 是一个不允许有重复元素的集合 。Set的实现类有HastSet和TreeSet。HashSet依赖于HashMap,它实际上是通过HashMap实现的;TreeSet依赖于TreeMap,它实际上是通过TreeMap实现的Queue 也就是队列 ,是一种遵循先进先出 (FIFO: First In, First Out)原则的数据集合,数据在Queue中的流动是单向的,从队尾流向队首。Queue 的实现类有 LinkedList,ArrayDeque,PriorityQueue
Collection接口中定义了多种方法可供其子类进行实现,以实现数据操作
int size():返回集合中的元素个数
boolean isEmpty():检查集合是否为空,如果集合中没有元素,则返回true,否则返回false
boolean contains(Object o):检查集合中是否包含指定的元素o,如果包含则返回true,否则返回false
boolean add(E e):将元素e添加到集合中,如果添加成功,则返回true。对于某些集合,可能会限制添加重复元素
boolean remove(Object o):从集合中移除指定的元素o,如果元素存在并成功移除,则返回true,否则返回false
boolean addAll(Collection<? extends E> c):将给定集合c中的所有元素添加到当前集合中,如果集合发生变化,则返回true
boolean removeAll(Collection<?> c):从当前集合中移除与给定集合c中相同的所有元素,如果集合发生变化,则返回true
boolean retainAll(Collection<?> c):保留当前集合和给定集合c中共有的元素,移除其他元素,如果集合发生变化,则返回true
void clear():清空集合中的所有元素
boolean containsAll(Collection<?> c):检查当前集合是否包含给定集合c中的所有元素,如果是,则返回true
Object[] toArray():将集合转换为Object类型的数组
<T> T[] toArray(T[] a):将集合转换为指定类型的数组
List 接口
在 Java 集合框架中,List 接口是一个有序的集合,允许包含重复元素。它扩展自 Collection 接口,因此继承了 Collection 中定义的一些通用方法,并且定义了一些特定于列表的方法。List接口中的元素可以根据插入的顺序访问,并且可以通过索引来访问和操作列表中的元素
List 集合特点
集合中的元素允许重复
集合中的元素是有顺序的,各元素插入的顺序就是各元素的顺序
集合中的元素可以通过索引来访问或者设置
List 接口为 Collection 直接接口。List 所代表的是有序的 Collection,即它用某种特定的插入顺序来维护元素顺序。用户可以对列表中每个元素的插入位置进行精确地控制,同时可以根据元素的整数索引(在列表中的位置)访问元素,并搜索列表中的元素。实现List接口的集合主要有:ArrayList、LinkedList、Vector、Stack
ArrayList ArrayList是一个动态数组,也是我们最常用的集合。它允许任何符合规则的元素插入甚至包括null。每一个ArrayList都有一个初始容量(10),该容量代表了数组的大小。随着容器中的元素不断增加,容器的大小也会随着增加。在每次向容器中增加元素的同时都会进行容量检查,当快溢出时,就会进行扩容操作。所以如果我们明确所插入元素的多少,最好指定一个初始容量值,避免过多的进行扩容操作而浪费时间、效率
size、isEmpty、get、set、iterator和 listIterator 操作都以固定时间运行。add 操作以分摊的固定时间运行,也就是说,添加 n 个元素需要 O(n) 时间(由于要考虑到扩容,所以这不只是添加元素会带来分摊固定时间开销那样简单)
ArrayList擅长于随机访问。同时ArrayList是非同步的
LinkedList 同样实现List接口的LinkedList与ArrayList不同,ArrayList是一个动态数组,而LinkedList是一个双向链表 。所以它除了有ArrayList的基本操作方法外还额外提供了get,remove,insert方法在LinkedList的首部或尾部
由于实现的方式不同,LinkedList不能随机访问 ,它所有的操作都是要按照双重链表的需要执行。在列表中索引的操作将从开头或结尾遍历列表(从靠近指定索引的一端)。这样做的好处就是可以通过较低的代价在List中进行插入和删除操作
与ArrayList一样,LinkedList也是非同步的 。如果多个线程同时访问一个List,则必须自己实现访问同步。一种解决方法是在创建List时构造一个同步的List:
1 List list = Collections.synchronizedList(new LinkedList (...));
Vector 与ArrayList相似,但是Vector是同步的。所以说Vector是线程安全的动态数组 。它的操作与ArrayList几乎一样
Stack Stack继承自Vector,实现一个后进先出的堆栈 。Stack提供5个额外的方法使得Vector得以被当作堆栈使用。基本的push和pop 方法,还有peek方法得到栈顶的元素,empty方法测试堆栈是否为空,search方法检测一个元素在堆栈中的位置。Stack刚创建后是空栈
Set 接口 Set 是一种不包括重复元素的 Collection 。它维持它自己的内部排序,所以随机访问没有任何意义。与List一样,它同样允许 null 的存在但是仅有一个。由于Set接口的特殊性,所有传入Set集合中的元素都必须不同 ,同时要注意任何可变对象,如果在对集合中元素进行操作时,导致 e1.equals(e2)==true,则必定会产生某些问题。Set接口有三个具体实现类,分别是散列集 HashSet、链式散列集 LinkedHashSet 和树形集 TreeSet
HashSet HashSet 是 set 接口的一个实现类,它所存储的元素是不可重复的,并且元素都是无序的。当想 HashSet 集合中添加元素时,首先会调用 hashcode 方法来确定元素的存储位置,然后再调用元素对象的 equals()方法来确保该位置没有重复元素
1
2
3
4
5
6
7
8
9
10
11
12
13
14
public class Test1 {public static void main (String[] args) {HashSet hashSet = new HashSet ();"Jack" );"Rose" );"Eve" );"Rose" );
向集合中存入元素时,为了保证 HashSet 正常工作,要求在存入对象是,需要重写 Object 类中的 hashCode()和 equals()方法。上个例子将字符串存入 HashSet 时,String 类已经默认重写了 hashCode 的方法,但是有时候传入自定义类型的对象存入 HashSet,需要重写方法
1
2
3
4
5
6
7
8
9
10
11
12
13
14
15
16
17
18
19
20
21
22
23
24
25
26
27
28
29
30
31
32
33
34
35
36
37
38
39
40
41
42
43
44
45
46
47
package Demo01;import java.util.ArrayList;import java.util.*;public class Test1 {public static void main (String[] args) {HashSet hashSet = new HashSet ();new Student ("2" ,"zhang" ));new Student ("8" ,"name" ));new Student ("4" ,"jack" ));new Student ("6" ,"row" ));class Student {public Student (String id, String name) {this .id = id;this .name = name;@Override public String toString () {return id+" " +name;@Override public int hashCode () {return id.hashCode();@Override public boolean equals (Object object) {if (this == object){ return true ; if (!(object instanceof Student)){ return false ; Student student = (Student) object; boolean b = this .id.equals(student.id); return b; 2 zhang, 4 jack, 6 row, 8 name]
TreeSet TreeSet 是一个有序集合,其底层是基于 TreeMap 实现的,非线程安全。TreeSet 可以确保集合元素处于排序状态。TreeSet支持两种排序方式,自然排序和定制排序,其中自然排序为默认的排序方式。 当我们构造 TreeSet 时,若使用不带参数的构造函数,则 TreeSet 的使用自然比较器;若用户需要使用自定义的比较器,则需要使用带比较器的参数
注意:TreeSet集合不是通过 hashcode 和 equals 函数来比较元素的。它是通过 compare 或者 comparaeTo 函数来判断元素是否相等。compare 函数通过判断两个对象的 id,相同的 id 判断为重复元素,不会被加入到集合中。
1 2 3 4 5 6 7 8 9 10 11 12 13 14 15 16 17 18 19 20 21 22 23 24 25 26 27 28 29 30 31 32 33 34 35 36 37 38 39 40 41 42 43 44 45 46 package Demo01;import java.util.ArrayList;import java.util.*;public class Test1 {public static void main (String[] args) {TreeSet treeSet = new TreeSet ();new Teacher ("jack" ,18 ));new Teacher ("rose" ,19 ));new Teacher ("tom" ,19 ));new Teacher ("rose" ,19 ));class Teacher implements Comparable {int age;public Teacher (String name, int age) {this .name = name;this .age = age;@Override public String toString () {return name +":" +age;@Override public int compareTo (Object obj) {Teacher teacher = (Teacher) obj;if (this .age- teacher.age>0 ){return 1 ;if (this .age- teacher.age==0 ){return this .name.compareTo(teacher.name);return -1 ;18 , rose:19 , tom:19 ]
Teacher类实现了 Comparable 接口,并重写 compareTo() 方法。在 compareTo() 方法中,首先针对 age 值进行修改,根据比较结果返回-1和1,当 age 相同时,再对 name 进行比较。教师 Teacher 对象首先按照年龄升序排序,年龄相同时会按照姓名进行升序排序,并且 TreeSet 集合会将重复的元素去掉。
1 2 3 4 5 6 7 8 9 10 11 12 13 14 15 16 17 18 19 20 21 22 23 24 25 26 27 28 29 30 31 32 33 34 package Demo01;import java.util.*;public class Test1 {public static void main (String[] args) {TreeSet treeSet = new TreeSet (new MyComparator ());"jack" );"hello" );"tom" );TreeSet treeSet1 = new TreeSet ((obj1,obj2)->{String s1 = (String) obj1;String s2 = (String) obj2;return s1.length() - s2.length();"jack" );"tom" );"hello" );class MyComparator implements Comparator {@Override public int compare (Object obj1, Object obj2) { String str1 = (String) obj1;String str2 = (String) obj2;int temp = str1.length()-str2.length();return temp;
LinkedHashSet LinkedHashSet 继承自 HashSet,其底层是基于LinkedHashMap来实现的 ,有序,非同步。LinkedHashSet 集合同样是根据元素的hashCode值来决定元素的存储位置,但是它同时使用链表维护元素的次序。这样使得元素看起来像是以插入顺序保存的,也就是说,当遍历该集合时候,LinkedHashSet将会以元素的添加顺序访问集合的元素
Queue 接口 在 Java 集合框架中,Queue 接口是一种特殊的集合,用于存储元素按照先进先出(FIFO,First-In-First-Out )的顺序进行排列。这意味着首先添加到队列的元素将首先被移除。Queue 继承自 Collection接口,并在其基础上定义了一些特定于队列的方法
Queue 接口中定义了以下一些常用的方法:
boolean add(E e):将元素e 添加到队列的尾部。如果队列容量有限且已满,该方法将抛出一个 IllegalStateException异常boolean offer(E e):将元素e 添加到队列的尾部。如果队列容量有限且已满,该方法将返回false,否则返回trueE remove():移除并返回队列头部的元素。如果队列为空,该方法将抛出一个 NoSuchElementException 异常E poll():移除并返回队列头部的元素。如果队列为空,该方法将返回nullE element():返回队列头部的元素,但不移除它。如果队列为空,该方法将抛出一个NoSuchElementException异常E peek():返回队列头部的元素,但不移除它。如果队列为空,该方法将返回 null
除了上述常用方法,Queue接口还继承自Collection接口中的一些其他方法,比如size()、isEmpty()、contains(Object o)等。
Queue 接口的实现类通常有:
LinkedList:LinkedList 可以用作队列的实现,因为它同时支持链表的特性和队列的特性ArrayDeque:ArrayDeque 是一个基于数组的双端队列,可以用作队列和栈的实现PriorityQueue:PriorityQueue 是一个优先级队列,可以根据元素的优先级进行排序。默认情况下,按照自然顺序排序,或者也可以通过自定义比较器指定排序规则
Queue 接口在Java中非常有用,特别是在多线程和异步编程中。可以帮助我们实现任务队列、消息队列等常见的场景
ArrayList 的实现 ArrayList 可以理解为动态数组,就是 Array 的复杂版本。与 Java 中的数组相比,它的容量能动态增长ArrayList 是 List 接口的可变数组的实现。实现了所有可选列表操作,并允许包括 null 在内的所有元素。除了实现 List 接口外,此类还提供一些方法来操作内部用来存储列表的数组的大小。(此类大致上等同于 Vector 类,除了此类是不同步的)
每个 ArrayList 实例都有一个容量 ,该容量是指用来存储列表元素的数组的大小 。它总是至少等于列表的大小。随着向 ArrayList 中不断添加元素,其容量也自动增长。自动增长会带来数据向新数组的重新拷贝,因此,如果可预知数据量的多少,可在构造 ArrayList 时指定其容量。在添加大量元素前,应用程序也可以使用 ensureCapacity 操作来增加 ArrayList 实例的容量,这可以减少递增式再分配的数量
注意,此实现不是同步 的。如果多个线程同时访问一个 ArrayList 实例,而其中至少一个线程从结构上修改了列表,那么它必须保持外部同步。(结构上的修改是指任何添加或删除一个或多个元素的操作,或者显式调整底层数组的大小;仅仅设置元素的值不是结构上的修改。)
底层数据结构 私有属性
1
2
transient Object[] elementData; private int size;
elementData 存储 ArrayList 内的元素,size 表示它包含的元素的数量
构造函数 ArrayList 提供了三种方式的构造器,可以构造一个默认初始容量为10 的空列表、构造一个指定初始容量的空列表以及构造一个包含指定 collection 的元素的列表,这些元素按照该 collection 的迭代器返回它们的顺序排列的
1
2
3
4
5
6
7
8
9
10
11
12
13
14
15
16
17
18
19
20
21
22
23
24
25
26
27
28
public ArrayList (int initialCapacity) {if (initialCapacity > 0 ) {this .elementData = new Object [initialCapacity];else if (initialCapacity == 0 ) {this .elementData = EMPTY_ELEMENTDATA;else {throw new IllegalArgumentException ("Illegal Capacity: " +public ArrayList () {this .elementData = DEFAULTCAPACITY_EMPTY_ELEMENTDATA;public ArrayList (Collection<? extends E> c) {if ((size = elementData.length) != 0 ) {if (elementData.getClass() != Object[].class)else {this .elementData = EMPTY_ELEMENTDATA;
元素存储 1 2 3 4 5 6 7 8 9 10 11 12 13 14 15 16 17 18 19 20 21 22 23 24 25 26 27 28 29 30 31 32 33 34 35 36 37 38 39 40 41 42 43 44 45 46 47 48 49 50 51 52 53 54 55 56 57 58 59 public E set (int index, E element) { E oldValue = (E) elementData[index]; return oldValue; public boolean add (E e) { 1 ); return true ; public void add (int index, E element) { if (index > size || index < 0 ) throw new IndexOutOfBoundsException ("Index: " +index+", Size: " +size); 1 ); 1 , size - index); public boolean addAll (Collection<? extends E> c) { int numNew = a.length; 0 , elementData, size, numNew); return numNew != 0 ; public boolean addAll (int index, Collection<? extends E> c) { if (index > size || index < 0 ) throw new IndexOutOfBoundsException ( "Index: " + index + ", Size: " + size); int numNew = a.length; int numMoved = size - index; if (numMoved > 0 ) 0 , elementData, index, numNew); return numNew != 0 ;
元素读取 1 2 3 4 5 6 public E get (int index) { return (E) elementData[index];
元素删除 ArrayList 提供了根据下标或者指定对象两种方式的删除功能。如下:
1 2 3 4 5 6 7 8 9 10 11 12 13 public E remove (int index) {E oldValue = (E) elementData[index]; int numMoved = size - index - 1 ; if (numMoved > 0 ) 1 , elementData, index, numMoved); null ; return oldValue;
首先是检查范围,修改modCount,保留将要被移除的元素,将移除位置之后的元素向前挪动一个位置,将list末尾元素置空(null),返回被移除的元素
1 2 3 4 5 6 7 8 9 10 11 12 13 14 15 16 public boolean remove (Object o) {if (o == null ) {for (int index = 0 ; index < size; index++)if (elementData[index] == null ) {return true ;else {for (int index = 0 ; index < size; index++)if (o.equals(elementData[index])) {return true ;return false ;
当移除成功后返回 true,否则返回 false。remove(Object o) 中通过遍历 element 寻找是否存在传入对象,一旦找到就调用 fastRemove 移除对象。因为 fastRemove 跳过了判断边界的处理,因为找到元素就相当于确定了 index 不会超过边界,而且 fastRemove 并不返回被移除的元素。下面是 fastRemove 的代码,基本和 remove(index) 一致
1 2 3 4 5 6 7 8 private void fastRemove (int index) {int numMoved = size - index - 1 ;if (numMoved > 0 )1 , elementData, index,null ;
自动扩容 每当向数组中添加元素时,都要去检查添加后元素的个数是否会超出当前数组的长度,如果超出,数组将会进行扩容,以满足添加数据的需求。数组扩容通过一个公开的方法 ensureCapacity(int minCapacity) 来实现。在实际添加大量元素前,我也可以使用 ensureCapacity 来手动增加 ArrayList 实例的容量,以减少递增式再分配的数量
1 2 3 4 5 6 7 8 9 10 11 12 13 14 15 16 17 18 19 20 21 22 23 public void ensureCapacity (int minCapacity) {if (minCapacity > 0 )private void ensureCapacityInternal (int minCapacity) {if (minCapacity - elementData.length > 0 )private void grow (int minCapacity) {int oldCapacity = elementData.length;int newCapacity = oldCapacity + (oldCapacity >> 1 );if (newCapacity - minCapacity < 0 )if (newCapacity - MAX_ARRAY_SIZE > 0 )
从上述代码中可以看出,数组进行扩容时,会将老数组中的元素重新拷贝一份到新的数组中 ,每次数组容量的增长大约是其原容量的 1.5 倍(从 int newCapacity = oldCapacity + (oldCapacity >> 1) 这行代码得出)。这种操作的代价是很高的,因此在实际使用时,我们应该尽量避免数组容量的扩张。当我们可预知要保存的元素的多少时,就指定其容量,以避免数组扩容的发生。或者根据实际需求,通过调用 ensureCapacity 方法来手动增加 ArrayList 实例的容量
Fail-Fast 机制 ArrayList 也采用了快速失败的机制,通过记录 modCount 参数来实现。在面对并发的修改时,迭代器很快就会完全失败,而不是冒着在将来某个不确定时间发生任意不确定行为的风险
LinkedList 的实现 Java 中的 LinkedList 类实现了 List 接口和 Deque 接口,是一种链表类型的数据结构,支持高效的插入和删除操作,同时也实现了Deque接口,使得 LinkedList 类也具有队列的特性。LinkedList 类的底层实现的数据结构是一个双端的链表
底层数据结构 LinkedList 底层通过双向链表实现 。双向链表的每个节点用内部类 Node 表示。LinkedList 通过 first 和 last 引用分别指向链表的第一个和最后一个元素。注意这里没有所谓的哑元,当链表为空的时候 first 和 last 都指向 null
1 2 3 4 5 transient int size = 0 ;transient Node<E> first;transient Node<E> last;
LinkedList 类中有一个内部私有类 Node,这个类就代表双端链表的节点 Node。在 Node<E> 中,成员变量 item 用来存储具体的元素值,另外两个 Node<E> 类型的变量 next 和 prev 分别表示该节点的后一个节点 和上一个节点
1 2 3 4 5 6 7 8 9 10 11 private static class Node <E> {this .item = element;this .next = next;this .prev = prev;
注意这个节点的初始化方法,给定三个参数,分别前驱节点,本节点的值,后继结点。这个方法将在LinkedList的实现中多次调用
构造函数 1 2 3 4 5 6 7 8 public LinkedList () {public LinkedList (Collection<? extends E> c) {this ();
LinkedList 主要就两个构造方法,一个无参的构造,什么也没做,另一个接受集合的构造,该方法初始化了 LinkedList 对象并添加了所有集合c的元素
LinkedList 因为基于链表,所以不需要提前申请内存大小 ,也就不存在初始化指定容量大小,因而LinkedList 是没有初始化指定 size 的构造方法的
添加元素 尾部添加 LinkedList 的添加方法有很多,首先最简单也是最常用的尾部添加。
1 2 3 4 public boolean add (E e) {return true ;
主要逻辑就是 linkLast(E e) 了。
1 2 3 4 5 6 7 8 9 10 11 12 13 void linkLast (E e) {final Node<E> l = last;final Node<E> newNode = new Node <>(l, e, null );if (l == null )else
尾部添加,就是构造新的节点 newNode,并将改节点的上一节点 prev 指向原来的 last,同时改节点为新的last节点。l == null 判断是否当前是第一次添加,如果 l 为 null,则 newNode 同时也是头结点,当前集合中仅有 newNode 一个元素,不为 null 时,因为双向链表,所有 l 的下一个节点 next 指向了newNode
最后就是大小 size 自增与操作计数 modCount 的自增,尾部添加元素就完成了
尾部操作除了 add,还有个 addLast(E e) 方法,两者除了返回值不一样没有任何差别,都是调用的 linkLast 方法
1 2 3 public void addLast (E e) {
中间添加 1 2 3 4 5 6 7 8 public void add (int index, E element) {if (index == size)else
对于中间添加,需要首先进行范围检查,即保证插入位置 index 在 [0, size] 之间,否则抛出数组越界异常 IndexOutOfBoundsException
1 2 3 4 5 6 7 8 private void checkPositionIndex (int index) {if (!isPositionIndex(index))throw new IndexOutOfBoundsException (outOfBoundsMsg(index));private boolean isPositionIndex (int index) {return index >= 0 && index <= size;
如果 index == size,其实就是尾部插入,所以调用了 linkLast,这个刚刚尾部插入已经说过。
如果 index < size,中间插入的时候,需要分两步:
node(int index) 方法获取到 index 位置的元素 succlinkBefore(E e, Node<E> succ) 将需要插入的元素 element 连接到 succ 后面
node 方法是一个频繁被调用的方法,LinkedList 的很多操作都依赖于该方法查找到对应的元素。根据索引 index 获取元素时,因为双向链表的支持前后遍历,所以进行了位置判断,index < (size >> 1),与中间位置比较,靠前则前序遍历,否则后序遍历
1 2 3 4 5 6 7 8 9 10 11 12 13 14 Node<E> node (int index) {if (index < (size >> 1 )) { for (int i = 0 ; i < index; i++)return x;else {for (int i = size - 1 ; i > index; i--)return x;
遍历逻辑很简单,循环到index上一个节点(后序则是下一个)位置,获取next(后序使用prev)返回index位置对应的节点Node对象succ
1 2 3 4 5 6 7 8 9 10 11 12 void linkBefore (E e, Node<E> succ) {final Node<E> pred = succ.prev;final Node<E> newNode = new Node <>(pred, e, succ);if (pred == null )else
linkBefore 和 linkLast 几乎完全一样,除了一个是添加到 last 节点后,一个是添加到 succ 节点后。
对于中间插入,如果 index 为 0 时,其实就是头部插入,这个时候比不用调用 node 方法去查找元素了,所以 LinkedList 也提供了一个 addFirst(E e) 方法。
1 2 3 4 5 6 7 8 9 10 11 12 13 14 15 public void addFirst (E e) {private void linkFirst (E e) {final Node<E> f = first;final Node<E> newNode = new Node <>(null , e, f);if (f == null )else
批量插入 LinkedList 提供尾部批量插入和中间批量插入,但内部实现其实都是调用的 addAll(int index, Collection<? extends E> c)
1 2 3 4 5 6 7 8 9 10 11 12 13 14 15 16 17 18 19 20 21 22 23 24 25 26 27 28 29 30 31 32 33 34 35 36 37 38 39 40 41 public boolean addAll (Collection<? extends E> c) {return addAll(size, c);public boolean addAll (int index, Collection<? extends E> c) {int numNew = a.length;if (numNew == 0 )return false ;if (index == size) { null ;else {for (Object o : a) {@SuppressWarnings("unchecked") E e = (E) o;new Node <>(pred, e, null );if (pred == null )else if (succ == null ) {else {return true ;
addAll(int index, Collection<? extends E> c) 方法初一看,好像有些复杂,但明白其原理后,就变得清晰多了。链表插入就如同接水管,先从某一个位置断开水管,然后用接口连接上需要接入的部分。这个方法里,关键的是两个 Node 对象 pred 和 succ,succ 是 index 位置元素,pred 是 index 的前一个元素(变动)
特殊情况 index == size 时,即尾部插入,所以 succ 就是 null 了,而 pred 则为尾部节点 last
然后就是循环赋值了,在循环中构造 node 节点,类似于 linkLast
最后的是衔接处理,如果尾部插入的话,那 pred 就是尾部节点了(循环赋值时有 pred = newNode 处理),所以只需要指定 last = pred 。而中间插入,指明 pred.next = succ、succ.prev = pred 即将 index 位置与新的前一个元素绑定到一起
offer 1 2 3 4 5 6 7 8 9 10 11 12 13 14 15 16 17 18 19 20 21 22 23 24 25 26 27 28 29 30 31 32 33 34 35 36 37 38 public class LinkedList <E> .....{public boolean offer (E e) {return add(e);public boolean add (E e) {return true ;void linkLast (E e) {final Node<E> l = last;final Node<E> newNode = new Node <>(l, e, null );if (l == null )else
从代码中可以很容易的看出,offer 方法直接调用了 add 方法,add 方法中调用了 linkLast 方法,并直接返回了true,表示该元素肯定可以插入成功。具体执行元素插入的逻辑在 linkLast 方法中完成,通过上面代码中的注释可以看出,linkLast 方法主要功能是在链表尾端添加一个新节点
offerFirst 和 offerLast
当了解了 offer 方法后,我们再看下 offerFirst 和 offerLast 的实现。从下面代码中可以知道,offerFirst 和 offerLast 方法分别调用了 addFirst 和 addLast 方法,然后在 addFirst 和 addLast 方法中,又分别调用了 linkFirst 和 linkLast 方法
linkLast 方法上已经讲到,主要功能是在链表尾端添加一个新节点;而 linkFirst 方法,其主要功能是在链表首端添加一个新节点,具体逻辑与 linkLast 方法类似,本处不再赘述,可以参考下面代码中的注释
1 2 3 4 5 6 7 8 9 10 11 12 13 14 15 16 17 18 19 20 21 22 23 24 25 26 27 28 29 30 31 32 33 34 35 36 37 38 39 40 41 42 43 44 45 46 47 public class LinkedList <E> .....{public boolean offerFirst (E e) {return true ;public boolean offerLast (E e) {return true ;public void addFirst (E e) {public void addLast (E e) {private void linkFirst (E e) {final Node<E> f = first;final Node<E> newNode = new Node <>(null , e, f);if (f == null )else void linkLast (E e) {
查找元素 LinkedList 除了提供通用的 get,因为其属性中含有 first 和 last 节点,也提供了 getFirst 和 getLast 方法
1 2 3 4 5 6 7 8 9 10 11 12 13 public E getFirst () {final Node<E> f = first;if (f == null )throw new NoSuchElementException ();return f.item;public E getLast () {final Node<E> l = last;if (l == null )throw new NoSuchElementException ();return l.item;
对于 getFirst 和 getLast,因为是成员变量,省去了查找的过程,直接返回其节点 item 即可
1 2 3 4 5 6 public E get (int index) {return node(index).item;
而通过指针的获取,主要就是调用node方法找对index对应的节点
修改元素 对于 LinkedList 集合中元素的修改,需要先查找到该元素,然后更改其 Node 节点数据 item 即可
1 2 3 4 5 6 7 8 9 public E set (int index, E element) {E oldVal = x.item;return oldVal;
删除元素 LinkedList 提供了很多种删除元素的方法,但是内部实现逻辑基本都相同,即找到对应的 Node 节点,然后将指向该节点的指向替换
根据索引移除 我们先来看看根据索引的 remove(int index) 方法
1 2 3 4 5 6 public E remove (int index) {return unlink(node(index));
删除时的范围检查就不说了,node方法也不再多提,删除的主要逻辑就是 unlink(Node<E> x) 方法
1 2 3 4 5 6 7 8 9 10 11 12 13 14 15 16 17 18 19 20 21 22 23 24 25 26 27 28 E unlink (Node<E> x) {final E element = x.item;final Node<E> next = x.next;final Node<E> prev = x.prev;if (prev == null ) {else {null ;if (next == null ) {else {null ;null ;return element;
整个 unlink 方法就是个标准的双向链表删除操作,三个节点 prev,x,next,删除 x 其实就是将 prev 指向 next,并 next 指向 prev,只是其中多了一些特殊的判断
看了按索引删除的 remove,再来看另外两个特例 removeFirst 和 removeLast
1 2 3 4 5 6 7 8 9 10 11 12 13 14 15 16 17 18 19 20 21 22 23 public E removeFirst () {final Node<E> f = first;if (f == null )throw new NoSuchElementException ();return unlinkFirst(f);private E unlinkFirst (Node<E> f) {final E element = f.item;final Node<E> next = f.next;null ;null ; if (next == null )null ;else null ;return element;
unlinkFirst 就是个简化版的 unlink 方法,因为只用处理头结点,下一个节点 next 存在就将 next 作为新的first
同理 removeLast 也是类似
1 2 3 4 5 6 7 8 9 10 11 12 13 14 15 16 17 18 19 20 21 22 public E removeLast () {final Node<E> l = last;if (l == null )throw new NoSuchElementException ();return unlinkLast(l);private E unlinkLast (Node<E> l) {final E element = l.item;final Node<E> prev = l.prev;null ;null ; if (prev == null )null ;else null ;return element;
而 LinkedList 还有个无参的 remove,这个是 Deque 接口定义的,实现也就是调用的 removeFirst
1 2 3 public E remove () {return removeFirst();
根据元素移除 根据元素移除其实和根据索引移除没有太大差别,只不过找到对应节点的方式发生了变化
1 2 3 4 5 6 7 8 9 10 11 12 13 14 15 16 17 18 19 public boolean remove (Object o) {if (o == null ) {for (Node<E> x = first; x != null ; x = x.next) {if (x.item == null ) {return true ;else {for (Node<E> x = first; x != null ; x = x.next) {if (o.equals(x.item)) {return true ;return false ;
可以看到,无论元素是否为 null,都是先找到该节点,然后调用了unlink 方法
因为支持双向遍历的特性,LinkedList 很人性的提供了前序删除和后序删除的方法,即 removeFirstOccurrence 与 removeLastOccurrence
1 2 3 4 5 6 7 8 9 10 11 12 13 14 15 16 17 18 19 20 21 22 23 24 public boolean removeFirstOccurrence (Object o) {return remove(o);public boolean removeLastOccurrence (Object o) {if (o == null ) {for (Node<E> x = last; x != null ; x = x.prev) {if (x.item == null ) {return true ;else {for (Node<E> x = last; x != null ; x = x.prev) {if (o.equals(x.item)) {return true ;return false ;
removeLastOccurrence 只是反序遍历了集合
批量删除 在 LinkedList 类中,并没有 removeAll 方法,因为他未对其进行重写,而是使用了父类 AbstractCollection 的
1 2 3 4 5 6 7 8 9 10 11 12 13 public boolean removeAll (Collection<?> c) {boolean modified = false ;while (it.hasNext()) {if (c.contains(it.next())) {true ;return modified;
removeAll 的实现原理其实就是迭代删除,迭代器的获取方法 iterator() 在 AbstractCollection 类中只是个抽象方法,AbstractList 类有其实现,但 AbstractSequentialList 类中覆写该方法。
1 2 3 public Iterator<E> iterator () {return listIterator();
iterator 方法会调用 listIterator(),这个方法实现在 AbstractList 类中,他调用了 listIterator(int index) 方法,但 LinkedList 重写了该方法,所以兜兜转转最终还是回到了 LinkedList 中
1 2 3 4 public ListIterator<E> listIterator (int index) {return new ListItr (index);
这里 ListItr 对象是 LinkedList 的内部类
1 2 3 4 5 6 private class ListItr implements ListIterator <E> {private Node<E> lastReturned;private Node<E> next;private int nextIndex;private int expectedModCount = modCount;
ListItr 在初始化的时候,会将操作计数器 modCount 赋值给 expectedModCount,而之后的每次 remove 方法,都会校验 expectedModCount 与 modCount 是否相等,否则会抛出异常
ListItr 的 remove 方法,每次调用后,都将 expectedModCount 自增,已达到和 unlink 中 modCount++ 的同步,从而使得 modCount == expectedModCount 一直成立,这也是为什么我们循环删除 LinkedList 元素时需要使用其迭代器的 remove 方法
1 2 3 4 5 6 7 8 9 10 11 12 13 14 15 16 17 18 19 20 21 22 23 public void remove () {if (lastReturned == null )throw new IllegalStateException ();if (next == lastReturned)else null ;final void checkForComodification () {if (modCount != expectedModCount)throw new ConcurrentModificationException ();
PriorityQueue 的实现 PriorityQueue 是Java集合框架中实现了 Queue 接口的一个特殊类,它是一个优先级队列。在优先级队列中,元素被赋予优先级,具有最高优先级的元素将首先被取出(取决于其排序顺序)。默认情况下,PriorityQueue 会对元素进行自然排序(如果元素实现了 Comparable 接口),也可以通过自定义比较器来指定排序规则
PriorityQueue 内部使用堆数据结构来实现,这使得插入和移除元素的时间复杂度都是O(log n),其中n是优先级队列的大小
PriorityQueue 的构造方法:
PriorityQueue(): 创建一个空的优先级队列,默认初始容量为11
PriorityQueue(int initialCapacity): 创建一个空的优先级队列,指定初始容量
PriorityQueue(int initialCapacity, Comparator<? super E> comparator): 创建一个空的优先级队列,指定初始容量和自定义的比较器
PriorityQueue(Collection<? extends E> c): 创建一个包含指定集合c中元素的优先级队列,默认按照元素的自然顺序排序
PriorityQueue(PriorityQueue<? extends E> c): 创建一个与指定优先级队列c具有相同元素的新优先级队列
PriorityQueue 主要方法:
boolean add(E e) 或 boolean offer(E e): 添加元素到队列中
E poll(): 移除并返回队列中的头部元素,如果队列为空则返回null。
E remove(): 移除并返回队列中的头部元素,如果队列为空则抛出NoSuchElementException异常
E peek(): 返回队列中的头部元素但不移除它,如果队列为空则返回null
E element(): 返回队列中的头部元素但不移除它,如果队列为空则抛出NoSuchElementException异常。
int size(): 返回队列中的元素个数
boolean isEmpty(): 检查队列是否为空
void clear(): 清空队列中的所有元素
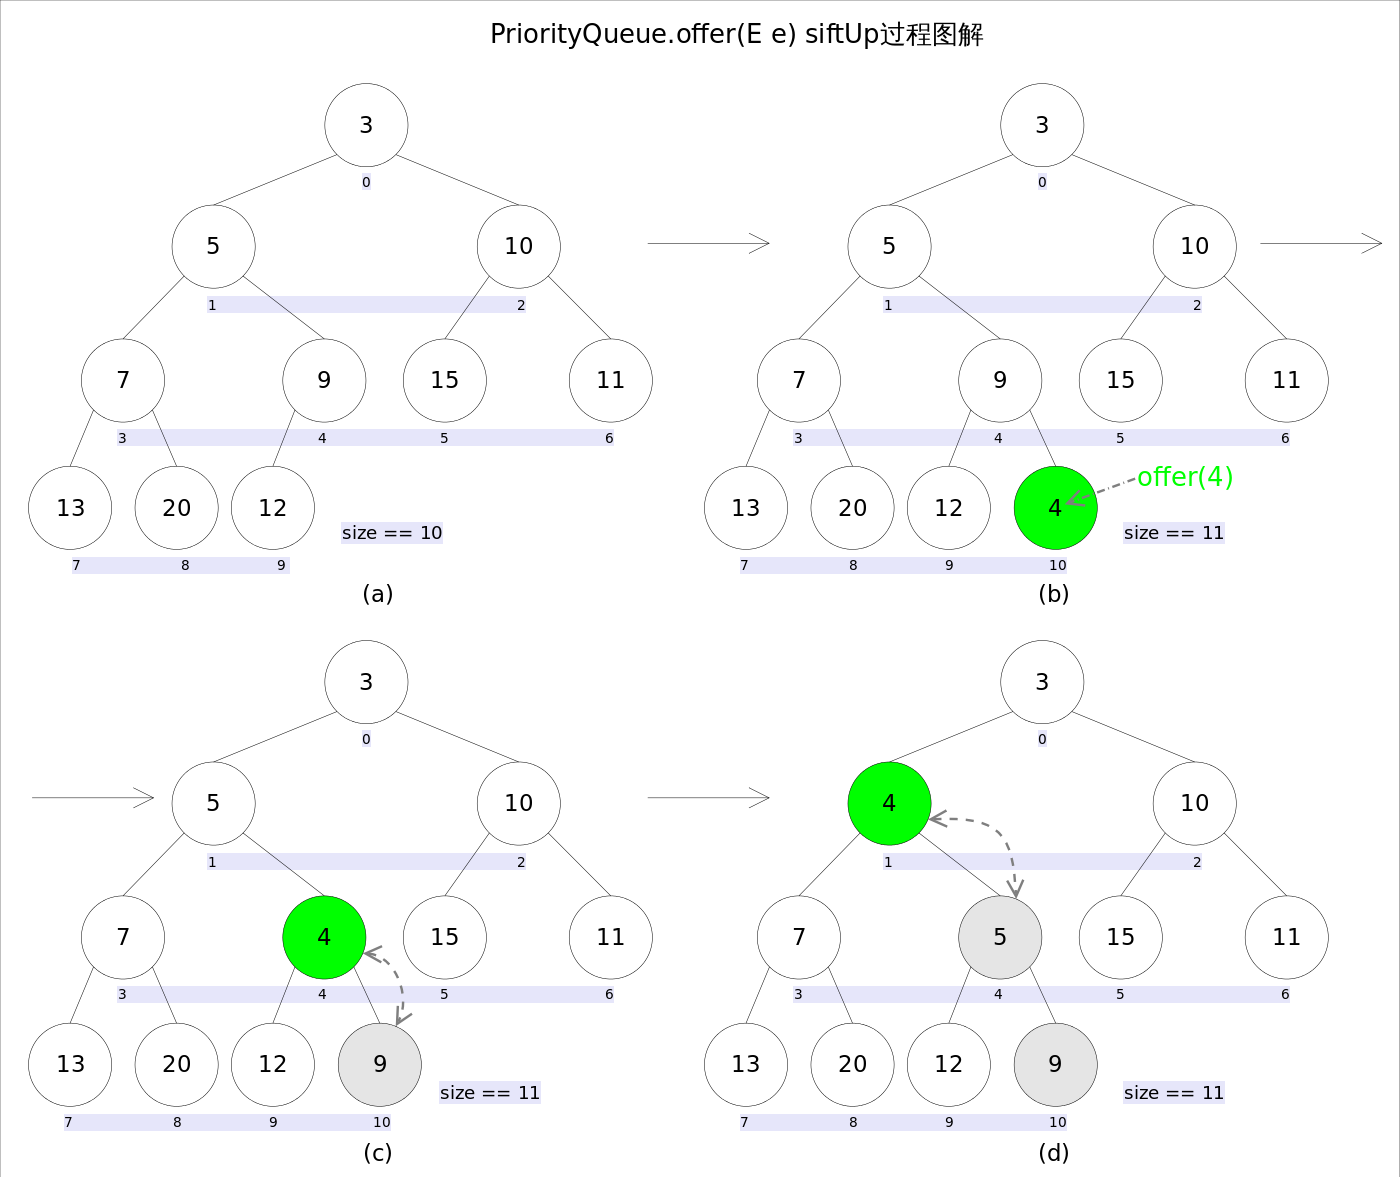
add() 和 offer() add(E e)和offer(E e)的语义相同,都是向优先队列中插入元素,只是Queue接口规定二者对插入失败时的处理不同,前者在插入失败时抛出异常,后则则会返回false。对于PriorityQueue 这两个方法其实没什么差别。
新加入的元素可能会破坏小顶堆的性质,因此需要进行必要的调整
1 2 3 4 5 6 7 8 9 10 11 12 13 14 15 public boolean offer (E e) {if (e == null )throw new NullPointerException ();int i = size;if (i >= queue.length)1 );1 ;if (i == 0 )0 ] = e;else return true ;
上述代码中,扩容函数grow()类似于ArrayList里的grow()函数,就是再申请一个更大的数组,并将原数组的元素复制过去,这里不再赘述。需要注意的是siftUp(int k, E x)方法,该方法用于插入元素x并维持堆的特性
1 2 3 4 5 6 7 8 9 10 11 12 private void siftUp (int k, E x) {while (k > 0 ) {int parent = (k - 1 ) >>> 1 ;Object e = queue[parent];if (comparator.compare(x, (E) e) >= 0 )break ;
新加入的元素x可能会破坏小顶堆的性质,因此需要进行调整。调整的过程为:从k指定的位置开始,将x逐层与当前点的parent进行比较并交换,直到满足x >= queue[parent]为止 。注意这里的比较可以是元素的自然顺序,也可以是依靠比较器的顺序
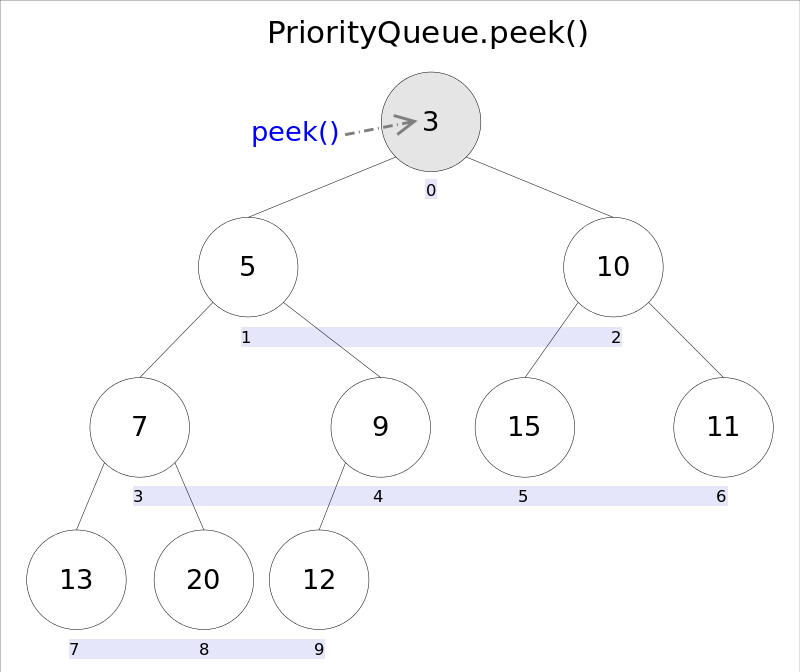
element() 和 peek() element() 和 peek() 的语义完全相同,都是获取但不删除队首元素,也就是队列中权值最小的那个元素,二者唯一的区别是当方法失败时前者抛出异常,后者返回null。根据小顶堆的性质,堆顶那个元素就是全局最小的那个;由于堆用数组表示,根据下标关系,0下标处的那个元素既是堆顶元素。所以直接返回数组0下标处的那个元素即可
代码也就非常简洁:
1 2 3 4 5 6 public E peek () {if (size == 0 )return null ;return (E) queue[0 ];
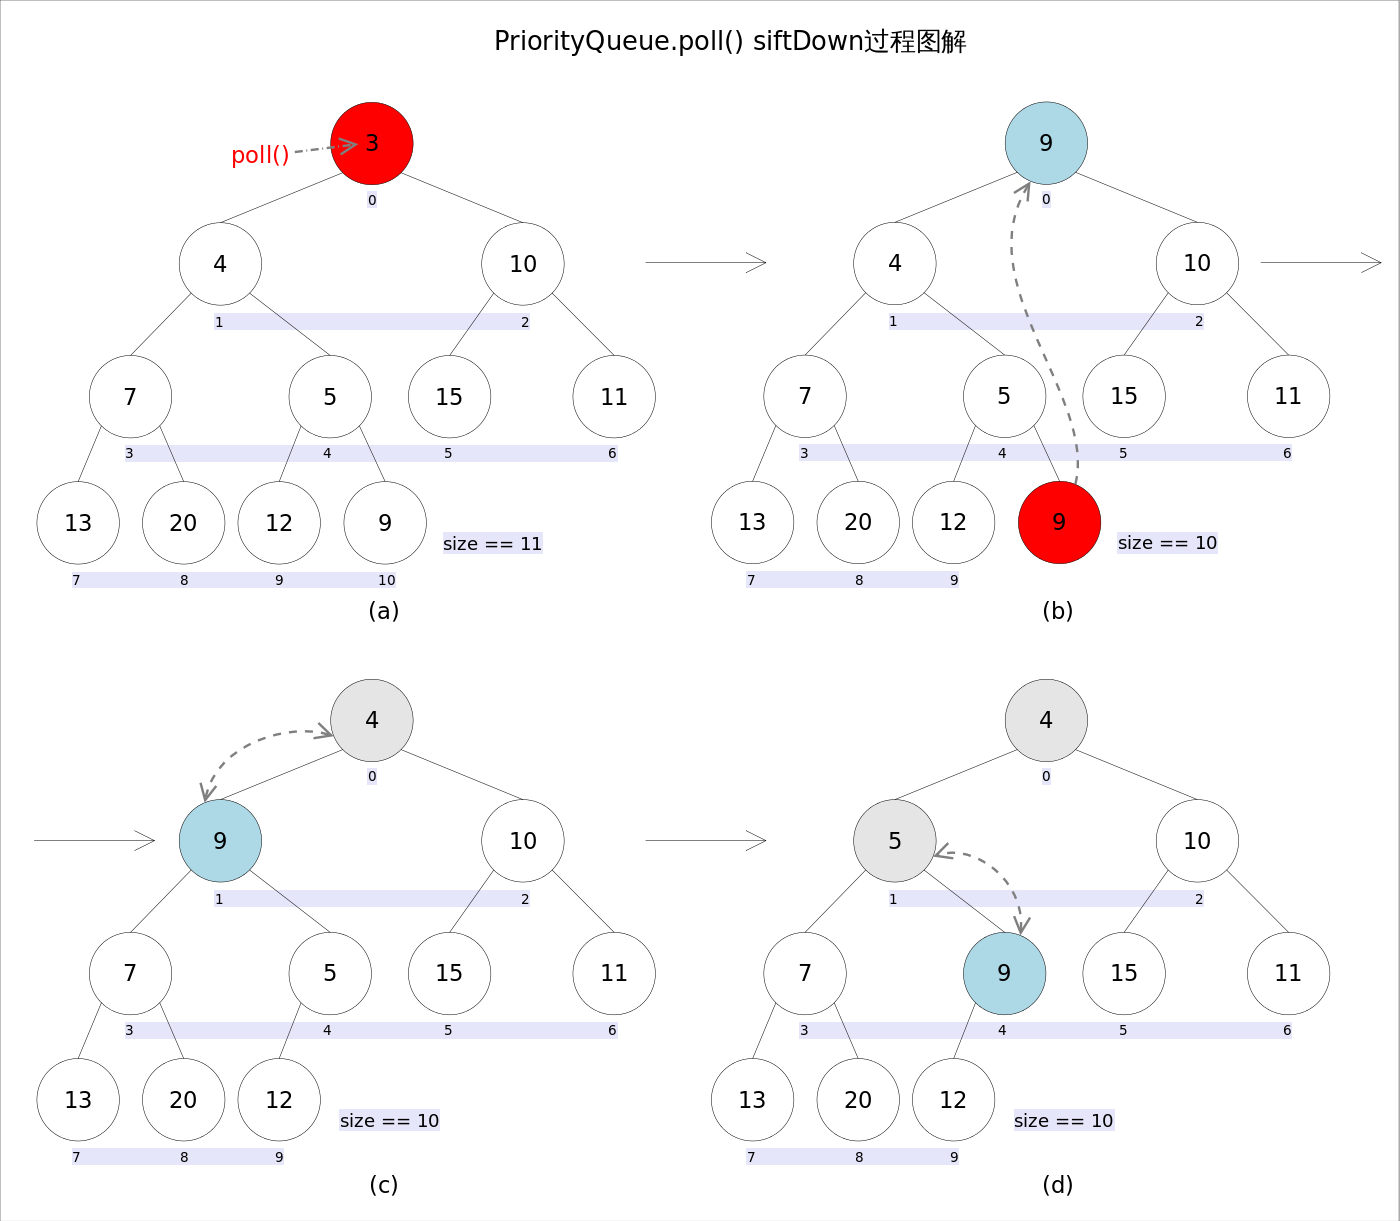
remove() 和 poll() remove() 和 poll() 方法的语义也完全相同,都是获取并删除队首元素,区别是当方法失败时前者抛出异常,后者返回null。由于删除操作会改变队列的结构,为维护小顶堆的性质,需要进行必要的调整。
代码如下:
1 2 3 4 5 6 7 8 9 10 11 12 public E poll () {if (size == 0 )return null ;int s = --size;E result = (E) queue[0 ];E x = (E) queue[s];null ;if (s != 0 )0 , x);return result;
上述代码首先记录0下标处的元素,并用最后一个元素替换0下标位置的元素,之后调用siftDown()方法对堆进行调整,最后返回原来0下标处的那个元素(也就是最小的那个元素)。重点是siftDown(int k, E x)方法,该方法的作用是从k指定的位置开始,将x逐层向下与当前点的左右孩子中较小的那个交换,直到x小于或等于左右孩子中的任何一个为止
1 2 3 4 5 6 7 8 9 10 11 12 13 14 15 16 17 18 private void siftDown (int k, E x) {int half = size >>> 1 ;while (k < half) {int child = (k << 1 ) + 1 ;Object c = queue[child];int right = child + 1 ;if (right < size &&0 )if (comparator.compare(x, (E) c) <= 0 )break ;
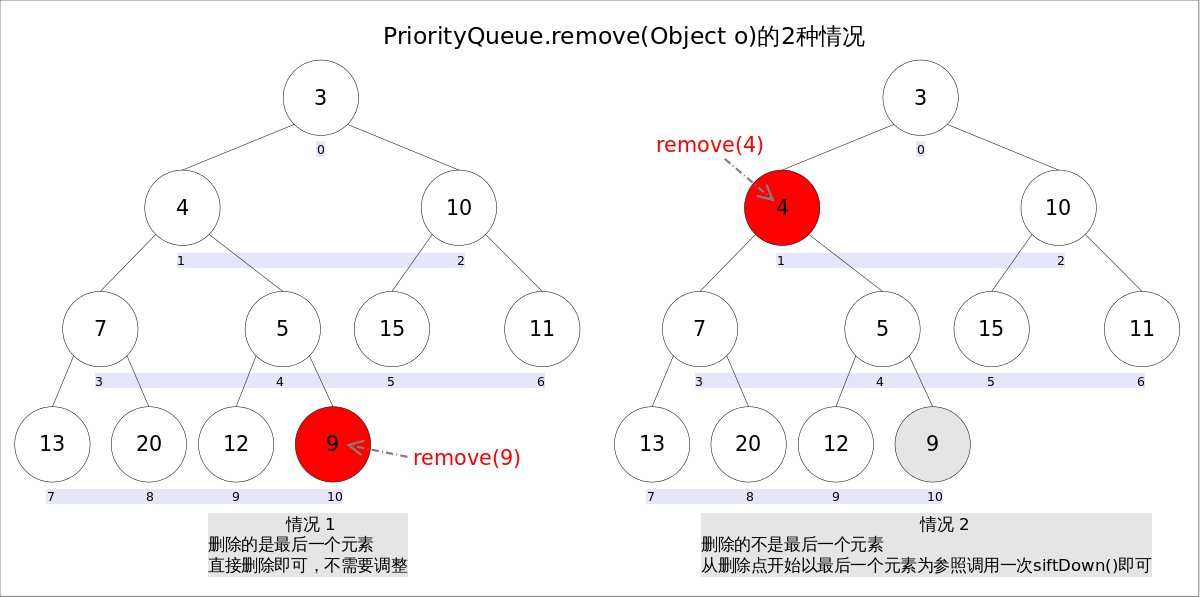
remove(Object o) remove(Object o)方法用于删除队列中跟o相等的某一个元素(如果有多个相等,只删除一个),该方法不是Queue 接口内的方法,而是Collection 接口的方法。由于删除操作会改变队列结构,所以要进行调整;又由于删除元素的位置可能是任意的,所以调整过程比其它函数稍加繁琐。具体来说,remove(Object o)可以分为2种情况: 1. 删除的是最后一个元素。直接删除即可,不需要调整。2. 删除的不是最后一个元素,从删除点开始以最后一个元素为参照调用一次siftDown()即可。此处不再赘述
具体代码如下:
1 2 3 4 5 6 7 8 9 10 11 12 13 14 15 16 17 public boolean remove (Object o) {int i = indexOf(o);if (i == -1 )return false ;int s = --size;if (s == i) null ;else {E moved = (E) queue[s];null ;return true ;
HashMap HashSet 由于是对 HashMap 的简单包装,所以将在下篇文章讲 HashMap 时在讨论